
The Topic of the Month for September 2016 is, Fitting a Guard. How do you go about creating a seamless fit between the ricasso and the face of the guard? Please share your tips, techniques and tools for this work.
I'll let you know when I'm able to do that... Haha so far I've failed 4 times

There is so much to say about this subject. But, one thing I really want to emphasize is how important it is to set the blade up for the fit before you even make the guard. There are at least three things to achieve with your blade, each very important, to insure that a good fit will be possible. I find it best to work in this order of sequence.
1-Parallel blade (ricasso) sides. This will allow the file guide to work properly. This applies whether you file 4 sides or two. Whether you hand fit or machine (mill) fit.
2-Good filing. Use sharp files and give strict attention to minute details. Aim small, miss small.
3-Tapered tang. This is very important, not only for balance, but to make your life easier when achieving a nice fit of the guard. A dial caliper, even a cheap one, is a wonderful thing.
These three things should be a habit. Include them in your process. They bring that all important area around the guard into sharp focus. We are dealing in small incremental measurements. A trained eye can see a couple thousands off, but raking light and reflections can make even smaller discrepancies show up. Immerse yourself in these details.

this is something I struggle with, and as such have been trying to come up with a best practices, to garner more control over it.
what have I found...
1 leave room for error, by this I mean if everything is fit but you still need to polish the face dont drill any pins!! leave room for thing to get trapped a couple of thousandths chamfer any where the slot needs to fit an inside 90 will allow for dust, glue, slight burs, the universes anger, what have you and keep everything flush.
2 under cut on the back side, there is no reason to fit a 1/2 of material when 1/8 will work as well.
3 it is metal you can push it around. if I end up with a gap from one file stroke to many I peen the material back reflat the top of the guard and continue on. (with in reason) we are smiths and have hammers , we can use them.
4 both the four sided shoulders and the two sided press fit have there uses, don't get stuck on just one method. I did all of my JS knives with 4 sided shoulders and a couple of them I realized after the fact, would have been far easier to get the fit if i had done a press fit.
MP

Become obsessive about flat, parallel, and perpendicular. A micrometer will teach you very much about your grinding. Guard material must be flat, pretty easy; flat and parallel; much harder. Same for the ricasso. A few degrees off of perpendicular on your mill/drill will kill you on your fit up.
M
Mike Williams
Master Smith
I guess I'm gona be the odd man out here. Years ago I developed my own method for achieving super tight guard fits. The first thing I did was throw out the old notion that ricassos must be perfectly flat and parallel. For me it all starts with forging the blade. I always make the center (front to back) of the ricasso the thickest part of a blade. I then clean up those "flats", ending up with a blade that is an elongated diamond shape (looking down on the spine). What this gives me is two tapers..... thickest at the middle of the ricasso, tapering to the point of the blade, and a taper from the middle of the ricasso to the end of the tang/handle. The "flats" of the blade are ground/cleaned up so there is a obvious "high spot" right in the middle of the ricasso. At first this bothered me, but I quickly realized that once everything is hand finished, the only way to tell that "high spot" exists is with a micrometer. I've also noticed that the method/way I do it.....giving full distal tapers fore and aft, produces a lighter feeling/"faster" feeling blade then when I would leave ricassos fully flat and parallel.
When installing the guard, I locate and drill each end of what will be the guard slot with a 1/8" drill bit. Then, using a 1/4" end mill, I mill a slot approx 3/4 of the guards thickness, leaving a 1/8" or less "web" on what will be the front of the guard. I then flip the guard over, and slot that "web" with a 1/8" end mill. Doing this means that I only have to "fit" that 1/8" or less web area that will be the front face of the guard.
Next comes filing. What I do here is very different then what most do..... I file the guard slot to a taper, with the smaller part of the taper being the front, and the wider portion of the slot being the back of the guard. I file and fit, file and fit until the guard is within about 1/4" to 1/2" of butting up against the blade shoulders. Once there, I lock the blade up in a vise, and "drive" the guard on with a "fork" I made from micarta. Since most guard materials are softer then the blade's tang, the guard material deforms and "stretches" to fit every contour of the tang perfectly. There are always some tiny "bulges" on the front, so I then tap the guard off, COMPLETELY finish off the face, and then tap it back in place. No filing shoulders on the tang, just super tight fits.
[media] https://youtu.be/n6RZHnBhYhQ [/media]
[media] https://youtu.be/n6RZHnBhYhQ [/media]
[media] https://youtu.be/5dVVaHffTPY [/media]
OK..... I've tried a couple of times to embed the videos.... not having much luck...... anybody wanna tell me how to embed them? <img src=' http://www.americanbladesmith.com/ipboard/public/style_emoticons//smile.gi f' class='bbc_emoticon' alt=':)' />.
Ed Caffrey, ABS MS
"The Montana Bladesmith"
www.CaffreyKnives.net
I can't say that I have gotten a perfect fit yet.
I have started doing something that is helping to not have to remove a ton of material.
I am hot punching the back of the guard with a a punch that is oversized to the tang.
Once I bottom out on the anvil I know I only have a small amount of material to drill, cut, file through.
This is similar to the relief that Matt has mentioned and milling out a larger hole in the back.
As I go about this, any gaps I chase shut with a small punch and then grind flush again.
Fit, repeat, etc.
My biggest challenge is the ricasso being square at all four corners.
I have a surface grinder but it is not converted yet.
Once it is I think that issue will be dealt with.
This is a great topic and one that applies to anyone who is working towards their JS as I am.
Thanks,
JJ
Here is a wooden mock up of a hidden tang knife. I wanted to illustrate the part that a parallel ricasso and tapered tang play on fitting a guard. With this oversized mock up, the angles and tapers are more pronounced and easy to see. When we make an actual blade the tapers and tolerances are much tighter but work exactly the same.
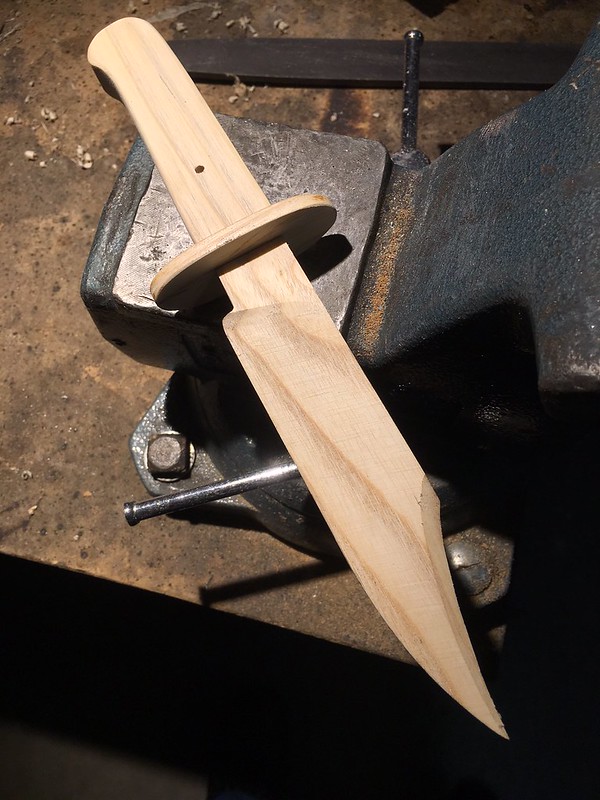
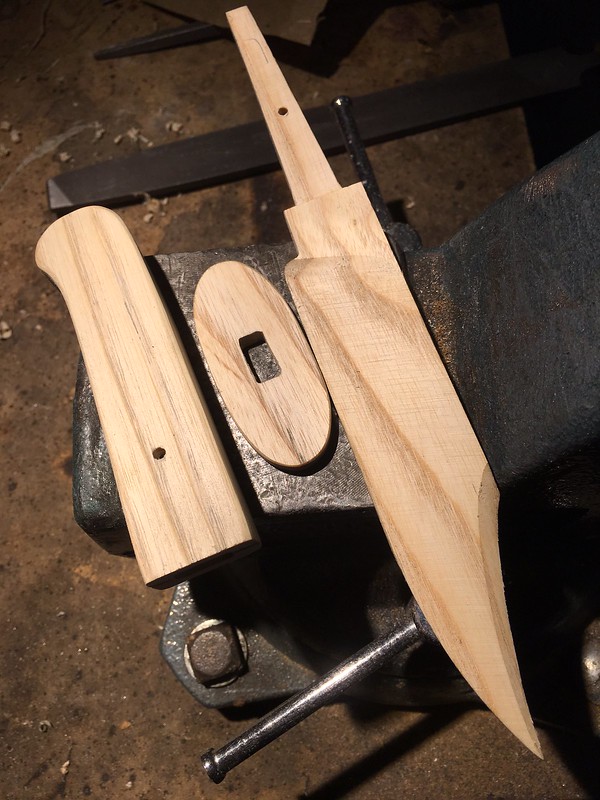
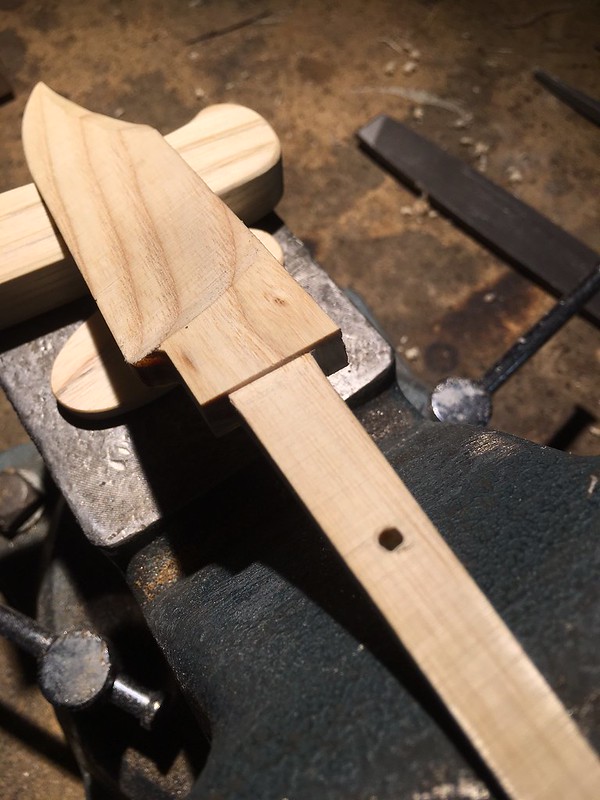
The tang is tapered two ways, distally and the profile. It may only be a few thousandths but it insures that the tightest place is right at the ricasso and tang juncture. The slot is clear of the tang all the way till it just fits at that juncture. The actual final fit can be done much easier and by different means as mentioned above.
Why is all of this so important? Because the strength of a hidden tang knife depends on tight joints. When there is no space or gaps, there is no movement possible. If it cant move there no lateral stress on the tang. Only tinsel. The claim that a "full tang handle is stronger" is fueled buy careless fitting of the joints.
The claim that a "full tang handle is stronger" is fueled buy careless fitting of the joints.
Amen to that statement!
I can't count how many times potential clients have insisted they wanted a full tang because "It's so much stronger then a hidden tang"...... when I hear that, it's time for a little education. <img src=' http://www.americanbladesmith.com/ipboard/public/style_emoticons//smile.gi f' class='bbc_emoticon' alt=':)' />
The thought of "careless fitting" brings another thought to my mind..... solder. Personally I've not used solder in a couple of decades now. In the past, many used solder as a compensatory measure for sloppy guard fits (I was one of them in my early years of knifemaking), but I would like to believe that we've progressed beyond that.....but still I get a lot of inquiries saying "what solder do you use?" And it always spurs a conversation when my reply is "I don't use solder." In my view, the only plausible reason for solder is a moisture seal between the blade/guard. With the advances in modern adhesives, solder has become a moot point, and in many ways a determent.
I always use the statement.... "If you use solder to affix a guard....then your fits are not tight enough." <img src=' http://www.americanbladesmith.com/ipboard/public/style_emoticons//smile.gi f' class='bbc_emoticon' alt=':)' />
Ed Caffrey, ABS MS
"The Montana Bladesmith"
www.CaffreyKnives.net

I use another philosophy.
I surface grind my tang and ricasso exactly the same. I want both sides parallel and equal.
I may then turn the knife 90 degrees on the surface grinder and remove a couple thousandths from the tang up to an including about 1/2 the width of the guard.
I mill my guard slot to the exact thickness of the ricasso. Why not?
I mill my guard shoulders, so I have an 1/8" radius on the shoulders, and this will make me radius the top and bottom of my guard slot. I might mill my slot a thousandth or so under-sized and do just a bit of tap-tap to drive the guard on.
Now, before I got a surface grinder, I did the exact same thing with a glass grinder platen and surface plate with sand paper.
Sand some - check some, until flat and even.
About the smartest thing I ever did was get a small mini-mill almost 15 years ago. I now have a larger mill, but I still use that mini-mill for countless of knife making actions.
I suggest getting one. It's uses in the knife shop are endless.
I have no idea how many hundreds of guard slots I milled with the mill.
When using a mill, your slot sides are nearly perfectly parallel, so why not make your ricasso sides parallel, too?
Seems like a no brainer to me.
This one was fit with a surface plate and sand paper. I also do NOT under-cut my ricasso sides. KNife making is hard enough the way it is, and most of my knives are take-down.
This will give different meaning to certain aspects of knife assembly.

Karl B. Andersen
Journeyman Smith

I have been waiting to join this discussion until I could take a few photos of the process to help describe the steps I use.
It doesn't really matter whether the ricasso sides are parallel or not. That is a style choice, but it definitely makes the whole process a LOT easier, if they are. So, I will focus on that approach. For me, the most important part is the prep work. Getting the ricasso sides nice and flat is the first step. Second comes the shaping of the tang area. There are two ways to go about this typically. I call them the two-shoulder and the four-shoulder methods. Lin has demonstrated what I call the four-shoulder method. I will cover the two-shoulder method.
I do something I don't see many folks doing, so let's start with a discussion of knife anatomy.
The area indicated by the pointer is where the shoulders are that the guard will sit up against. This is at the rear of the ricasso.

The pointer is at what I call the "hump". This is long enough to penetrate the guard, and almost all the way through the spacer package. It is slightly tapered to get wider towards the guard.

I make use of this handy little filing jig from Riverside Machine Works (aka Uncle Al) It has carbide faces that laugh at abrasives.

I then attach the jig to the knife using a machinist's square to get it square to the spine exactly where I want the guard to sit and the ricasso to end.
Carbide faces toward the tang.
BTW, I use the same jig to set my plunge cuts. Just turned around so the carbide faces are where the plunge cuts go.

Get it good and tight and you can now grind off the shoulders down to the carbide faces. You can use the 2x72 or the disc. You can even use a piece of sand paper on a steel stick or a file if you like, but the grinder is much faster! <img src=' http://www.americanbladesmith.com/ipboard/public/style_emoticons//cool.gi f' class='bbc_emoticon' alt='B)' />


I use a little of both. I use the 2x72 to take off most of the meat and finish up on the disc. You must use fresh abrasives, and finish at 220 or higher grit. Grind right down to the carbide.

The result is two shoulders that are really flat, perfectly inline and square to the spine, and a hump to cut the guard slot to fit around.

I have a lot more work to do on this knife before I set the guard, but I wanted to get the prep work posted. I will take some pics of the guard slotting and setting process when I get to that stage.
Joshua States
www.dosgatosforge.com
https://www.youtube.com/channel/UCdJMFMqnbLYqv965xd64vYg
https://www.facebook.com/dos.gatos.71
Also on Instagram and Facebook as J.States Bladesmith
“So I'm lightin' out for the territory, ahead of the scared and the weak and the mean spirited, because Aunt Sally is fixin’ to adopt me and civilize me, and I can't stand it. I've been there before.â€
So today I finished the blade and etched it. So, I am ready to slot and fit a guard.
A lot of folks (myself included) use a mill to slot the guard, but it isn't necessary (just ask Jean Louis Regel!).
Before I got the mill I had to do everything by hand with the only power tool used was a drill press. I am going to show that method here. It has a lot of photos, so be prepared.
Like I said before, I emphasize prep work. First we need to know the slot's dimensions. The hump measures .830" long at the base of the shoulders and .217" thick. (it's difficult to hold the calipers and the camera at the same time!)


The guard I am going to use with this knife is double branch and will fit inside a rectangle 1" wide by 2-1/2" long.
So I lay out the rectangle on a sheet of nickel-silver and scribe the center line. The bottom branch will hang about 1" below the ricasso and the shoulders are 1/8" tall, so I mark a spot on the center line 1-3/16" up from the bottom.
Then I make a mark 27/32" up from that (.830" is a little less than 27/32") and draw the cross lines. 3/16" is a little less than .217" so I mark 3/32" on either side of the center line, top and bottom and draw the box with the scribe. Then I spot check the box against the hump area to see if I am close to where I want to be.


Now I drill three holes inside the box. I use an undersized drill bit so there's little chance of wandering outside the box.
Then I chuck the entire sheet in a bench vice. This is important! DO NOT cut out the guard yet. Work with the largest piece you can. I use a jeweler's saw to cut out the webs between the holes.


Using a set of small files, I rough in the sides to the line, but not past it, using the flat file. Then I rotate the work piece and set the corners and the ends with the square file. BTW- if you don't already own a set of these, get one: http://www.homedepot.com/p/Nicholson-4-in-American-Pattern-File-Set-with-Pouch-6-Piece-22062NN/205215046


Check the length and get it slightly (+/- .004") over the required length. Using the flat file again, set the safe edge against the end and slowly take a bit off the sides using the lines as visual guides. Check top, center, and bottom frequently. You want to finish between .004" and .007" narrower than the thickness of the ricasso.


This goes pretty fast with a good set of files. You are now ready to cut out the guard and set it on the knife.
Joshua States
www.dosgatosforge.com
https://www.youtube.com/channel/UCdJMFMqnbLYqv965xd64vYg
https://www.facebook.com/dos.gatos.71
Also on Instagram and Facebook as J.States Bladesmith
“So I'm lightin' out for the territory, ahead of the scared and the weak and the mean spirited, because Aunt Sally is fixin’ to adopt me and civilize me, and I can't stand it. I've been there before.â€
On to setting the guard.
Cut the guard out of the sheet with a hack saw, jeweler's saw, or if you have one, a bandsaw.
Let me introduce you to my guard setting team......
I have two sacrificial guard plates (one is covered on one face with blue painter's tape) and the guard setting gizmo.
The gizmo is two pieces of 3/8" plate held about 3/16" apart with two pieces of 1"x1/8" inch plate welded in place. The sacrificial guards are made of 3/16" mild steel.

For those of you who looked through the last thread and thought "Gee, this is gonna take some practice to get good at it", make the sacrificial guards using the same technique. You will need a few of these in varying slot widths anyway. It's important that the slot in the sacrificial guard is only slightly wider (+/- .007") than the thickness of the knife you are working on.
Check the fit by pressing the guard onto the tang with your hands. You should be able to slide it up to the hump. Align it so the slot is centered over the top and bottom of the hump area.

At this point I wrap the blade in a sheath of shop towel. It will spend the rest of the making process wrapped in this sheath to protect it. I tape the towel with blue painter's tape. (what ever did we do without that stuff?) Now I chuck the blade up, point down, in the post vise. USE SOFT RUBBER JAWS!!!!
The first sacrificial guard goes on with the tape against the real guard, followed by the second sacrificial guard, and the gizmo.

Now, give it a few good whacks with a 2-1/2 pound sledge and press that guard down to the shoulders. This took about 8 mild hits before it bottomed out. Check the fit.


That's my method, tools, jigs, etc. for setting a guard without a mill. I do the same for the spacers, only I adjust the length of those slots to match the taper I put in the hump.
Joshua States
www.dosgatosforge.com
https://www.youtube.com/channel/UCdJMFMqnbLYqv965xd64vYg
https://www.facebook.com/dos.gatos.71
Also on Instagram and Facebook as J.States Bladesmith
“So I'm lightin' out for the territory, ahead of the scared and the weak and the mean spirited, because Aunt Sally is fixin’ to adopt me and civilize me, and I can't stand it. I've been there before.â€
Thanks for all of the explanations and photos. They're really useful to a lot of us.
Jeremy
Jeremy Lindley, Apprentice Smith
This guard was fit using my digital calipers jaws to measure and then as the guide to scribe on my guard blank.
Both the height and width of the tang hole.
Before that I punched from the back until I bottomed out on the anvil and then drilled a small hole from the back so I could use a jewelers saw to cut out my scribed hole.
A little filing and I had fit up.
My tang is stepped like Joshuas so the guard slides up to almost the should without messing with any fit.
Then it has to slip over a second step like his and be fit to the ricasso shoulders.
Once fit, I remove gap by using a crowned small hammer and shrinking the hole from the front.
Grind flush, hammer on with a monkey tool and repeat until it is tight.
The gunk you see in the pic is lint from trying to get the oil off for a good pic.

