Hi All,
I am pretty new to Damascus and do everything by hand. To date I have really only made twist Damascus. I am currently working on a new billet and it is at 64 layers currently. I looking for some recommendations on which basic patterns lend themselves the best to hand forging? Also topic would be, which patterns seem to be best at retaining the most material? Due to the slow progress using the hand hammer, I end up losing a lot of material to scale on top of any alterations made for a pattern.
Thanks for any Suggestions,
Josh
A question that I can appreciate because my favorite patterns are the ones that waste the least material and are easy to do. This why I will always make more twist based patterns that others, there is no quicker way to pattern a piece of steel with almost no waste than to twist it. On the other hand, one pattern that I like the least is ladder, I hate turning that much steel into dust. As for hand hammering v.s. press/power hammer, the very idea of patterning is controlling the resulting pattern, making it symmetrical or uniform. So There are great many "patterns" that work better with a power hammer, and best with a press. But if chaos or randomness is the basis of the pattern, then hand hammering will work better. Hand hammers naturally produce more interesting random patterns, and if you work with flat dies on a power hammer or press, you almost need to make "randomizer" texturing tools to make the pattern interesting. Of course, twists also can overcome, or even benefit, from the random deformation of a hand hammer.
"One test is worth 1000 'expert' opinions" Riehle Testing Machines Co.
There are lots of patterns you can develop with a hand hammer. The truth is that the press and power hammer make it a lot easier, but they are not impossible without those tools. (it might be helpful to have a striker or two). Kevin's point of wasted steel can also be overcome by cutting the bars with a band saw, if you have one, instead of grinding away so much steel. Tim Hancock cut his ladder patterns when he wanted a wide ladder, pressed and ground them when he wanted it tight. I usually cut my end-grain patterns and save the little triangles, weld them back together and get another usable bar. Ed Caffrey takes all those little pieces and does what he calls Fossil Damascus in a can. Smiths that waste steel don't go to Valhalla!
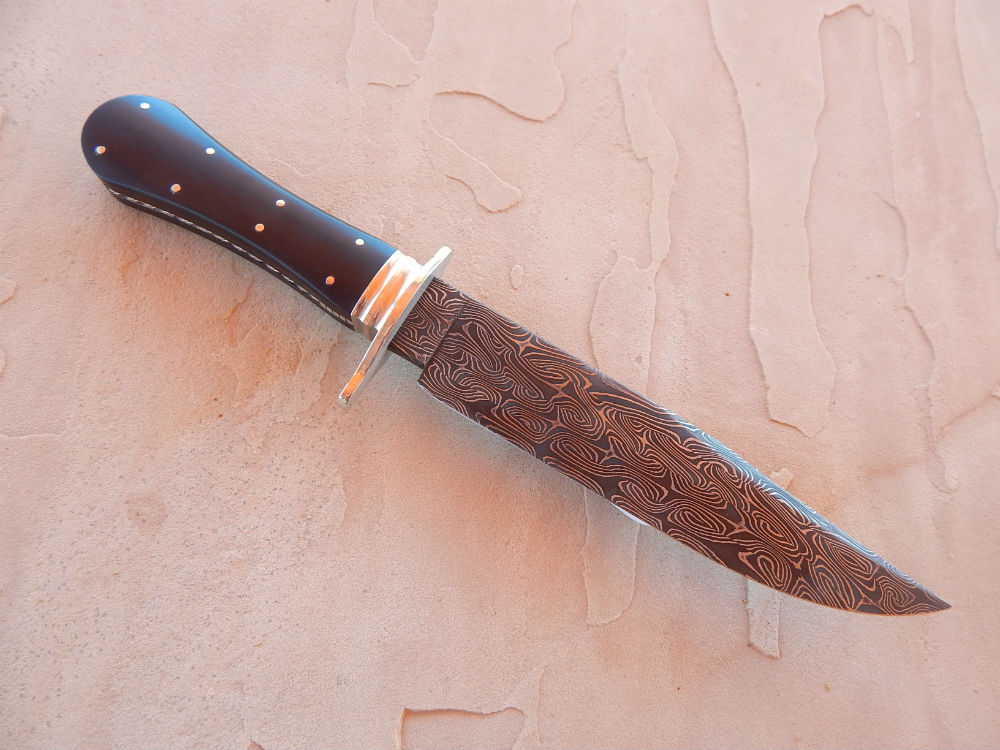
The ancient smiths made good use of twists and expanded the applications with multiple bars. The most common is what we call the Turkish twist. I would suggest you try this one out. To save yourself some forging and material loss, try using lower layer counts and tighter twists. Twist up an even number of bars, half of them right twist and half of them left. Stack the bars alternating the twists and forge weld the bars together. Make the knife from the resultant bar. If the Vikings could do this by hand in the 9th century, you can too!
Here is an example I made from 4 bars, maybe 14-16 layers each. (maybe less, I have forgotten)
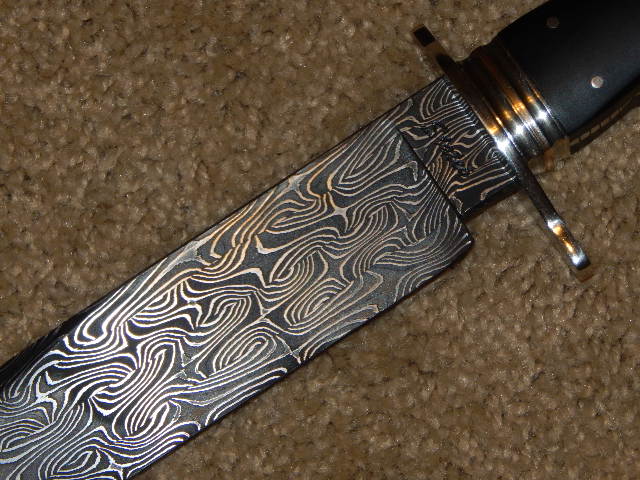
If you look really close, you can see where the bars meet.
Joshua States
www.dosgatosforge.com
https://www.youtube.com/channel/UCdJMFMqnbLYqv965xd64vYg
https://www.facebook.com/dos.gatos.71
Also on Instagram and Facebook as J.States Bladesmith
“So I'm lightin' out for the territory, ahead of the scared and the weak and the mean spirited, because Aunt Sally is fixin’ to adopt me and civilize me, and I can't stand it. I've been there before.â€
|quoted:
A question that I can appreciate because my favorite patterns are the ones that waste the least material and are easy to do. This why I will always make more twist based patterns that others, there is no quicker way to pattern a piece of steel with almost no waste than to twist it. On the other hand, one pattern that I like the least is ladder, I hate turning that much steel into dust. As for hand hammering v.s. press/power hammer, the very idea of patterning is controlling the resulting pattern, making it symmetrical or uniform. So There are great many "patterns" that work better with a power hammer, and best with a press. But if chaos or randomness is the basis of the pattern, then hand hammering will work better. Hand hammers naturally produce more interesting random patterns, and if you work with flat dies on a power hammer or press, you almost need to make "randomizer" texturing tools to make the pattern interesting. Of course, twists also can overcome, or even benefit, from the random deformation of a hand hammer.
Thank you Sir, That is kind of what I had guessed, that the twist would be the most hand hammer friendly.
|quoted:
There are lots of patterns you can develop with a hand hammer. The truth is that the press and power hammer make it a lot easier, but they are not impossible without those tools. (it might be helpful to have a striker or two). Kevin's point of wasted steel can also be overcome by cutting the bars with a band saw, if you have one, instead of grinding away so much steel. Tim Hancock cut his ladder patterns when he wanted a wide ladder, pressed and ground them when he wanted it tight. I usually cut my end-grain patterns and save the little triangles, weld them back together and get another usable bar. Ed Caffrey takes all those little pieces and does what he calls Fossil Damascus in a can. Smiths that waste steel don't go to Valhalla!
The ancient smiths made good use of twists and expanded the applications with multiple bars. The most common is what we call the Turkish twist. I would suggest you try this one out. To save yourself some forging and material loss, try using lower layer counts and tighter twists. Twist up an even number of bars, half of them right twist and half of them left. Stack the bars alternating the twists and forge weld the bars together. Make the knife from the resultant bar. If the Vikings could do this by hand in the 9th century, you can too!
Here is an example I made from 4 bars, maybe 14-16 layers each. (maybe less, I have forgotten)
If you look really close, you can see where the bars meet.
Thank you Sir, I will definitely try this one. So from what i understand on this one you would make a couple different billets and twist, then square them up and grind them clean again before forge welding them back together? How long are your bars typically? I would worry about making them too long with when using a hand hammer in fears that I would get a poor weld
|quoted:
Thank you Sir, I will definitely try this one. So from what i understand on this one you would make a couple different billets and twist, then square them up and grind them clean again before forge welding them back together? How long are your bars typically? I would worry about making them too long with when using a hand hammer in fears that I would get a poor weld
Basically, yes you have the correct process in mind. Do you have a MIG welder to tack the bars together on the ends and across the middle? Welding the billets to a handle also helps a lot.
If not, you can use rebar tie-wire or hose clamps to hold the bars while you heat and forge.
As for length, ancient smiths would do this with sword length bars and I know some guys who do 30-40 inch bars by hand. Doing this in a press or power hammer takes equipment with fine adjustment controls or the billet of bars can roll over easily ruining the bar completely. Bars are usually 1/4" to 1/2" squares, depending on how much forging to shape is intended for the blade from the welded bar-billet.
I don't know if any ABS smiths have done any videos of this process. Maybe some of the admin staff knows, and can post a link.
Dave Stephens is a swordsmith I follow on FB who did a very good YT video on this for Arctic Fire 2016. I'll see if I can locate the link for you.
Joshua States
www.dosgatosforge.com
https://www.youtube.com/channel/UCdJMFMqnbLYqv965xd64vYg
https://www.facebook.com/dos.gatos.71
Also on Instagram and Facebook as J.States Bladesmith
“So I'm lightin' out for the territory, ahead of the scared and the weak and the mean spirited, because Aunt Sally is fixin’ to adopt me and civilize me, and I can't stand it. I've been there before.â€
Great Looking Knife Joshua.
Thanks Jeff. It stuns me that I made it almost 3 years ago.
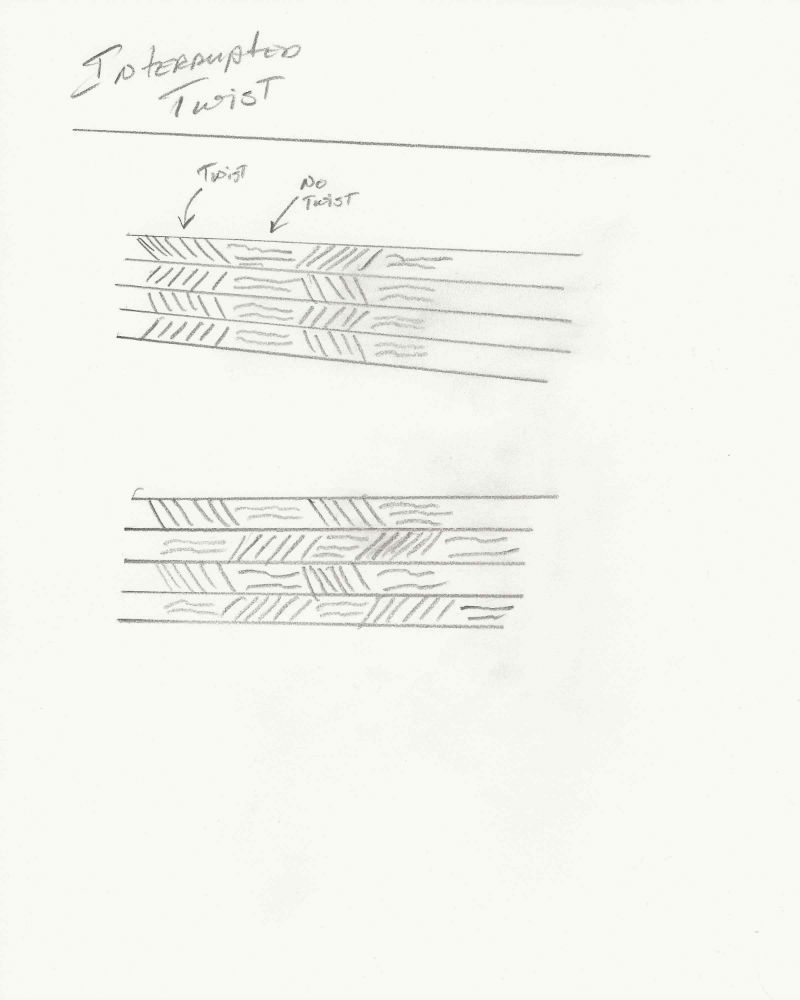
Another variation of this that was used in Viking age blades, was the interrupted twist. I don't have any photo examples that I have done, so I'll try and describe it. When twisting the bar, you only twist a small section (maybe 2-3 inches) and leave a section untwisted, then twist another short section, and so on. You still do multiple bars reversing the twists and alternating directions. When you arrange the bars, you put the untwisted sections edge outward so they appear as wavy lines. You can line up the twisted areas or offset them for a different look. This takes a lot more control during the twisting operation.
Maybe a drawing will help clarify.
Joshua States
www.dosgatosforge.com
https://www.youtube.com/channel/UCdJMFMqnbLYqv965xd64vYg
https://www.facebook.com/dos.gatos.71
Also on Instagram and Facebook as J.States Bladesmith
“So I'm lightin' out for the territory, ahead of the scared and the weak and the mean spirited, because Aunt Sally is fixin’ to adopt me and civilize me, and I can't stand it. I've been there before.â€


