Hello Everyone,
Tom from 84 PA here. I have been reading thru past posts in this section of the forum and would like to take the time to create a very thorough tutorial on my method of doing the tradition hand sewing of leather, commonly referred to as the saddle stitch. A lot of the following content is my personal opinion based on over 24 years in the craft. I will be sharing a couple ideas I came up with that helped me get very consistent results. As the old adage goes, there are 100 ways to skin a cat, If you have a different method that works for you that is great. Please share it. The intent of this article is to help those either just starting out attempting a sheath and those who have been putting up a fight trying to get the results and seeming to miss a piece of the puzzle.
Saddle stitching can be a very laborious task. For me, its a means to an end. I don't enjoy doing it, but I enjoy the results when it is done correctly. Getting a needle to pass thru three to sometimes five pieces of 9-10oz leather is a feat in and of itself. Getting each corresponding stitch to follow the pattern/outline of the sheath as well as getting the stitching to look just as good on the back only adds to the difficulty. The saddle stitch is the strongest method of stitching a sheath together. This might explain why another common name for this stitch is the lock stitch. I'm sure we've all had a leather item that wore thru the stitching and it rapidly unraveled and fell apart. That is the achilles' heel of machine stitching. I have owned various brands of commercial leather machines and always came back to hand stitching due to items I made and intended for hard use coming back with a stitching defect.With hand stitching, the weakest link becomes any snaps installed on the item, but those are easy to drill out and replace. If you are in the market for a machine, follow alone. This might change your mind.
The following posts will show:
- Necessary tools and Part#s (#s Acquired from Tandy Leather but can be purchased from numerous vendors)
- Short description of leathers and weights recommended
- Showing of each tool and its function
- Step by Step process of completing the stitch
I'll get to it.
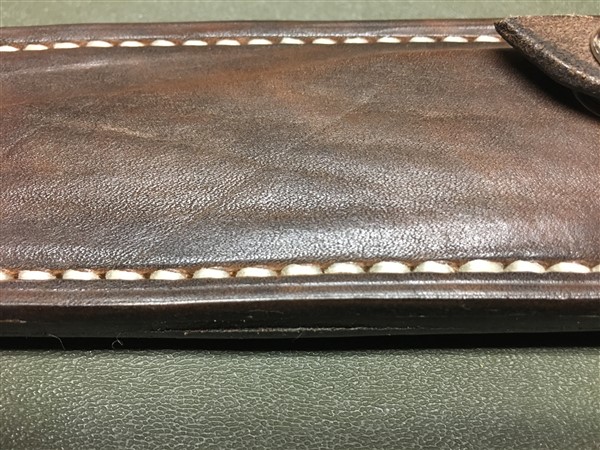
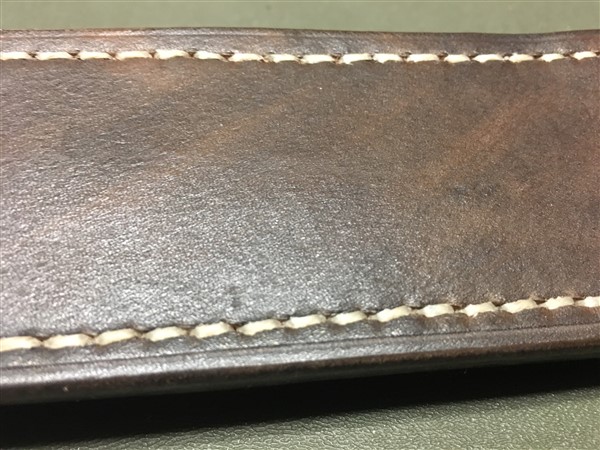
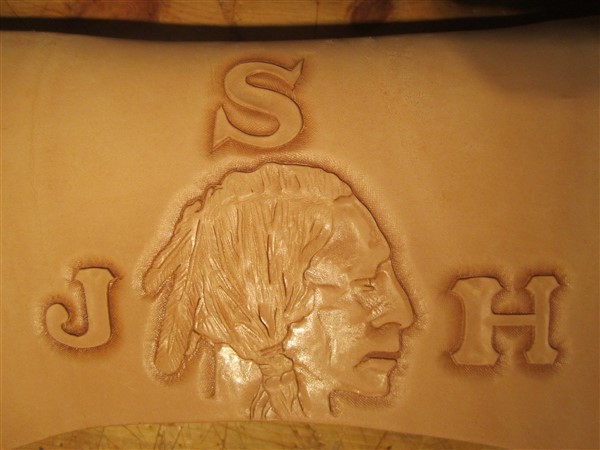
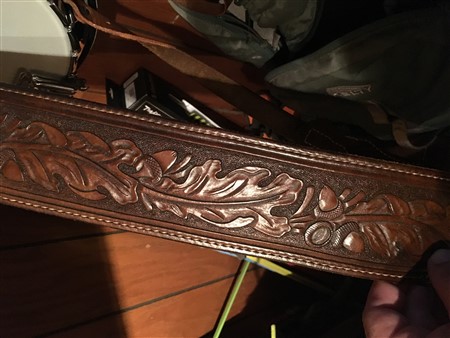
Here is an example of what we should be looking for. These two pictures show the front and back of the same sheath.
Broken down to its simplest form, Saddle stitching is one piece of string with a needle on both ends that are passed thru holed previously pierced thru the leather in a repeatable pattern.
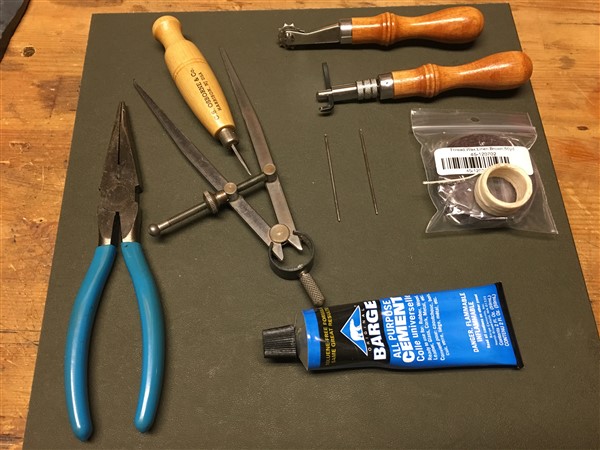
These are the tools that you will need.
Picture--1
Needle nose pliers
Barge Cement# 2514-01
Wing Divider# 3607-00
Stitching Awl
Adjustable stitching groover
Over stitch spacer----- These items can be purchased together in a basis hand stitching set such as# 11190-00
Harness needles
Waxed linen thread
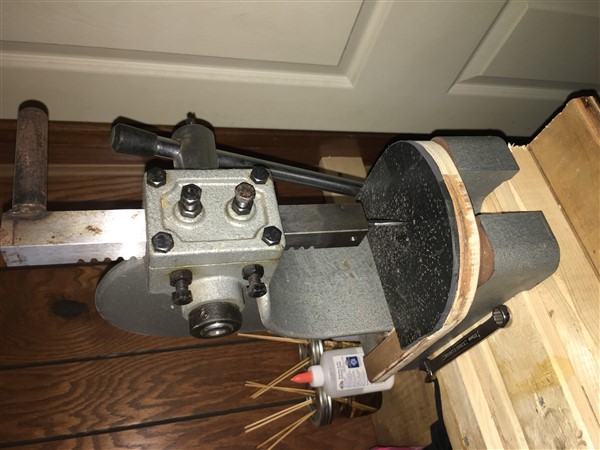
Picture#2
Arbor press-Purchase at Harbor Freight +/- $50
Diamond awl blade# 83022-01
If you don't already own an arbor press you can pick this model up at Harbor Freight for $50.
Lets get more detail on the press.
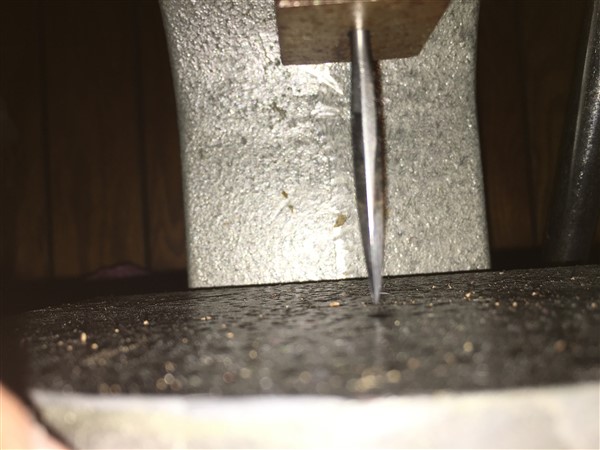
I drilled a hole in the bottom of one side of the ram to slide the shank of the awl blade into. I drilled a hole in the side which was tapped for a set screw that anchors the awl blade. The platform is simply constructed of plywood with a piece of commercial mudflap adhered to the face using the barge cement displayed above.
Once these items are aquired, you will need some leather. A heavy knife needs a heavy leather sheath. Nothing irritates me more with sheaths than to see a heavy knife, say a chopper/camp knife in a floppy 5-6oz leather sheath. We've all seen this. For a heavy knife, you want 9-10oz shoulder leather. I personally use this weight for every sheath I make because I do not like a flimsy sheath, and I have never heard " that sheath is just too heavy". As far as my preference for shoulders, other areas of the hide will suffice, but once it is wet molded to your knife, the dense grain in the shoulder will retain the shape and fit indefinitely. If your into carving leather, you have no doubt heard of Hermann Oak. This is a domestic vegetable tanned hide that does wonders to retaining the detail in leather carvings and is my favorite hands down. It is expensive, but when you are carving and want maximum detail, you pay the premium.
With the intent of this article being the assembly of sheaths, you can absolutely get by with the import shoulders that you can purchase thru Tandy and other various vendors. I only recommend vegetable tanned leather for knife sheaths. I see no benefit from the other chemical processes used in creating the various other styles of leather.
Now to discuss the tools and their part in this craft.
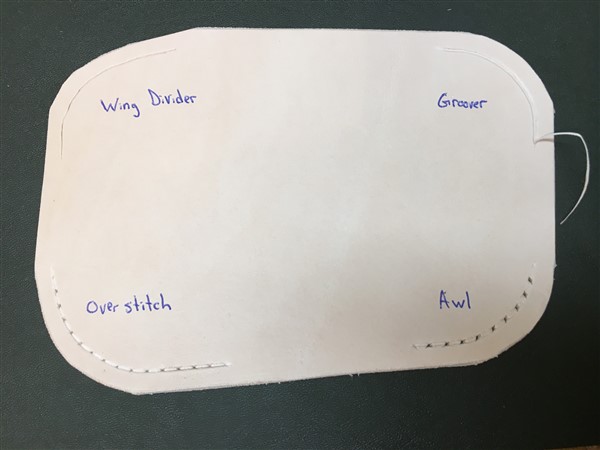
The wing divider is used to lay out the actual stitch line around the edge of your sheath. With the heavy leathers I prefer, that is followed up setting the adjustable stitching groover to the same distance from the edge. This tool removes a small strip of leather that allows your stitching to sit flush with the surface of the leather. This will increase the durability of your stitching as well as make it look really good. I only do this on the front side of the project. The next step is to run the overstitch spacer down the line creating the spacing for your holes that will follow. This tool is basically a spiked wheel mounted on an axle that has a handle attached.
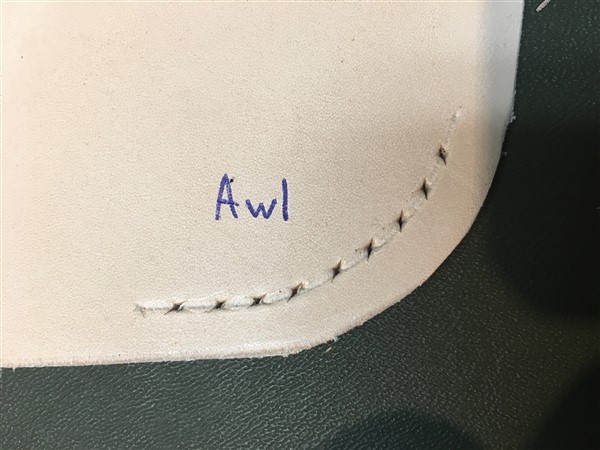
When you look straight in to the tip of the diamond awl, you will notice that it is infact, diamond shaped. This is for a very good reason. The placement of each hole has to be very precise and exactly like the one before and after.
Lets have a closer look at the holes of the example that were awl'ed.
Notice that the inside flat of the diamond shape is kept in line with the inside dge of the stitch line, and that position is maintained thru the curve. It must keep that position for every hole of that stitch. Having the awl mounted in the press enables you to turn the work piece with one hand, lining up the awl while the other feeds the awl thru the leather. On the press, there is no fighting, sweating, or cussing. The awl can only go one place...where you want it.
This completes the first post. I will return with a sheath project to show the process of actually stitching the leather, proper way to end the stitch, how to complete a stitch if your string breaks, ect. If there is a need for it, I can make a similar post about gluing up a sheath or any other processes that someone might find beneficial at a later date.
Take care,
This is awesome stuff Tomas. I actually just bought some leather working tools the other day. I have never made a leather sheath before or anything leather. I have recently been doing some research on making a sheath. So your tutorial couldn't have came at a better time.
Want to see more of my work follow me on Instagram:JasonVolkertKnives
Want to get in touch with me [email="[email protected]"]Email[/email] me.
Great tutorial! Thanks for your time investment.
Karl B. Andersen
Journeyman Smith
Thanks for sharing this tutorial!
This is awesome Tom. Even though I have been making sheaths for....well, a really long time, and have used everything from a Speedy Stitcher to a Tippman Aerostitch, I have come back to the harness/lock stitch and hand work. I agree it just looks and wears the best. I have already learned a new trick in the first post with that arbor press, and hope to get another arrow in the quiver from this. Thanks for the tutorial.
Joshua States
www.dosgatosforge.com
https://www.youtube.com/channel/UCdJMFMqnbLYqv965xd64vYg
https://www.facebook.com/dos.gatos.71
Also on Instagram and Facebook as J.States Bladesmith
“So I'm lightin' out for the territory, ahead of the scared and the weak and the mean spirited, because Aunt Sally is fixin’ to adopt me and civilize me, and I can't stand it. I've been there before.â€
You're welcome. I appreciate the positive reinforcement Gents. I feel it is our duty to share these skills to keep the crafts we love alive. I'm enjoying this just as much myself. Joshua, its great to hear this is already helping someone out.
Alright, lets dive back in....
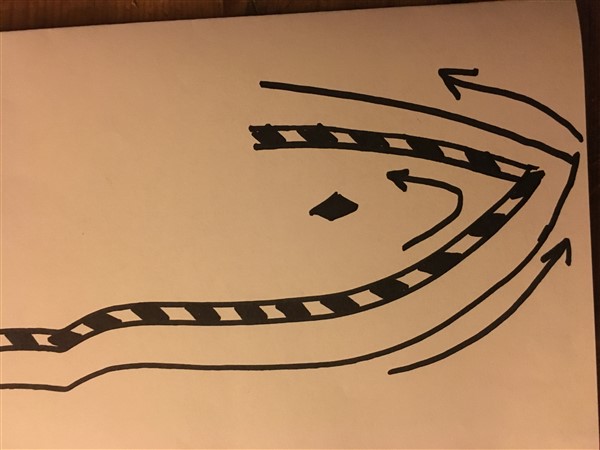
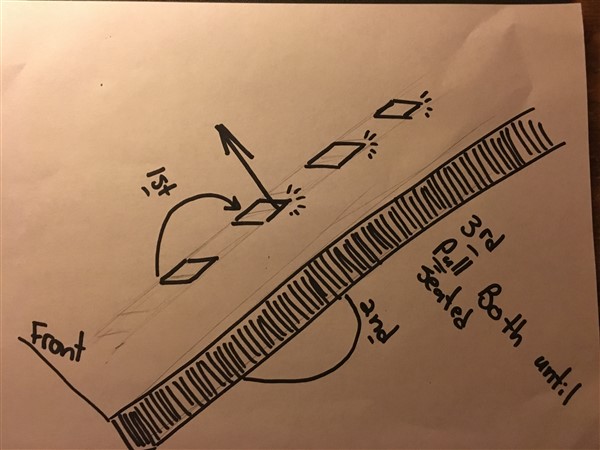
When I left off showing the awl'ed out holes, I feel more detail is need in that area. This is a critical step. Side Note: I could not find pictures with the detail I am looking for to demonstrate this part of the lesson so I did a couple rough drawings to help demonstrate what I will be trying to explain. I feel it necessary to show it this way because you might not notice it once we get to pictures of actually stitching leather.
The blacked out areas represent the holes that the awl makes in the leather. One of the flats has to stay in line with the inside edge of the stitching. Once you pierce the first hole, they all must stay turned the same way. The arrows at the bottom of the sheath in this drawing is my attempt to illustrate the need to rotate the leather when you get to the bottom to continue piercing with the same awl orientation. Once all of the holes are thru. Its time to thread your needles.
You need one on each end of the thread. A common question is "how much thread to use". Its does not matter. I will be teaching you how to continue if you run out or break off the thread. I look at it this way, thread is cheap and the easiest way to do this process is to have enough the first time so start off with a piece the span of your arms width.
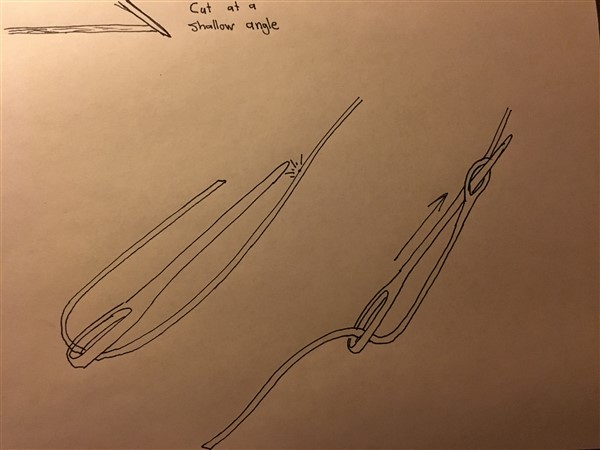
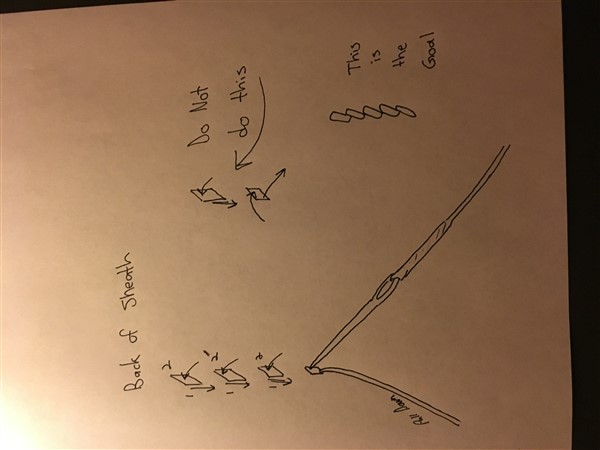
These next couple drawings illustrate threading the needle.
Cut the end of the thread at a very shallow angle to create a very fine tip. This will greatly ease guiding the heavy thread thru the small eye of the needle. Pull the thread thru the eye about the length of the needle. At that point, lay the point of the needle against the running thread and pierce it as close to the middle as possible. If you don't get it close to centered, you will break off at some point and get to practice trying again!!
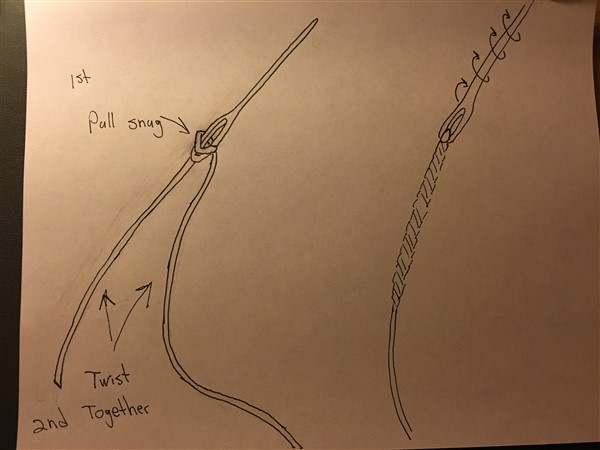
now pull the needle thru the piercing and pull the tail snug. Hold both parts of the string in one hand and the needle in the other and pull in opposite directions. Once snug, spin the needle while the string is still under tension. One down, now repeat with the other needle. Once both needles threaded you are ready to stitch.
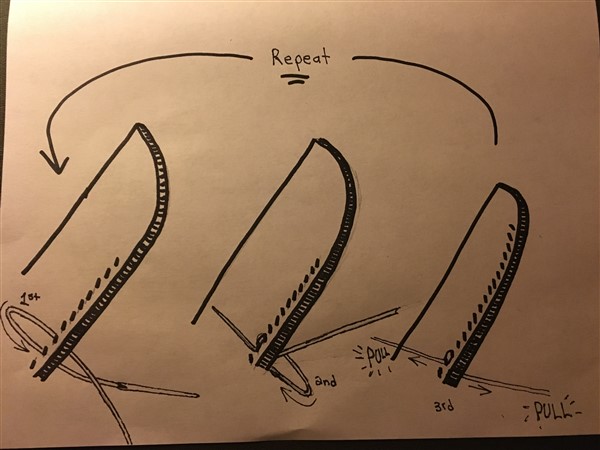
The actual stitching process is three simple steps.
You will notice that in the drawings, I started the stitch two holes from the mouth of the sheath. I do that so I stitch up to the mouth and then down the entire stitch. This doubles the stitch in the highest wear area. Double stitching is tougher physically because of the amount of thread in the holes. The needles must be pulled straight to ease the tension on the eye, so use the needle nose pliers when you are coming back down those first two and save the wear on you and the needles.
Now, not to get ahead of myself, the same three step process is the same no matter which direction you are stitching.
Lets look at it in detail.
Starting the first stitch, poke thru the leather and pull the thread thru until you have equal lengths on both ends. Now take the end on the front side of the leather and poke thru the next hole. pull the rest of that needles thread thru. Now look at the back side of that hole. While pulling the thread down and away from the leading point, thread the second needle thru the leading point of the awl hole. Pull the rest of that needles thread thru to the front. Pull both threads evenly tight. You will feel the thread cinch down. That is "locking" the stitch. Congratulations!! You just completed one saddle stitch. If your sheath is for a 3" hunting knife you have about 40 more. 14" bowie...you'll be a while!! Haha All in good fun.
Lets get more detail in that three step process. Go thru the second hole front side first and pull all of the thread thru. On the back side, pull the string that you just pulled thru the front down and away from the leading point of the awl hole and Poke the backside needle thru at the leading point of the hole.
The importance of performing the rear part of the stitch this way is due to the fact that this is the part of the process that if done correctly, will make the back side of your stitch look as good as the front side. In the last page of drawings, notice the picture that says. "do not do this" If you fail to pull the front string down and away and end up crossing over the strings, your stitch line will wander back and forth and they will not stack up evenly on the other stitches, which should be the goal.
Now, going back to the picture showing me going up two stitches to the mouth of the holster, you now know why it doesn't matter which direction you go in. You are always threading the rear needle thru the leading point of the awl'ed hole with the other string pulled down and away.
I want to be very clear by stating...these steps shown today are crucial to making your entire stitching job look uniform and pleasing to the eye. Unlike the artistic feat of carving leather and forging steel, the actual stitching process, one loop after another, after another has to be exact. If you can follow the three steps I have shown...and repeat them, over and over and over,you will have your stitching down pat.
I'll call that a wrap for post two. I'll be back to continue.
Take care,
Tomas- thank you so much for this information. It is very helpful! I've been wavering on starting making leather sheaths and this is reducing my anxiety for sure.
This is really great stuff. I'm gonna start working on my first sheath this weekend.
Want to see more of my work follow me on Instagram:JasonVolkertKnives
Want to get in touch with me [email="[email protected]"]Email[/email] me.
I had forgotten about some of those tips you showed.
Thanks for the reminder!
Karl B. Andersen
Journeyman Smith
Tomas on your recommendation for the Awl (Diamond awl blade# 83022-01) I looked it up and they have like 4 different sizes to choose from. Which 1 do you suggest They have a "small, medium, large, straight, or curved" to choose from.
Want to see more of my work follow me on Instagram:JasonVolkertKnives
Want to get in touch with me [email="[email protected]"]Email[/email] me.
Jason, I bought the set but found that I use the medium size almost exclusively.
I'll be working my day job thru most of this weekend. Hopefully sometime early next week I'll work on my next leather project so I can wrap up the details for the tutorial. I'm glad that this was able to be found helpful by numerous people. Your past posts have certainly helped me with the forging questions I had.
Have a great weekend All.
Take care,
Thanks for the info Tomas
Want to see more of my work follow me on Instagram:JasonVolkertKnives
Want to get in touch with me [email="[email protected]"]Email[/email] me.
|quoted:
Jason, I bought the set but found that I use the medium size almost exclusively.
I'll be working my day job thru most of this weekend. Hopefully sometime early next week I'll work on my next leather project so I can wrap up the details for the tutorial. I'm glad that this was able to be found helpful by numerous people. Your past posts have certainly helped me with the forging questions I had.
Have a great weekend All.
Take care,
Tom- I bought the materials and basic tools and I'm ready to follow along! Can't wait for the next steps
Hello All. Im glad so many people found this information helpful. I have been compliling info to start another thread on sheath building. Before starting that, I want to jump back on here and tie up some unfinished business, pun intended.
Where we left off, you were taught how to do the stitching in a three step process. What do you do if your thread breaks or you run out? How do you finish the stitch? We'll get those questions answered right now.
If your thread breaks off, you need to pull out enough of your already completed stitches to have some thread to pull on with your needle nose pliers. You want the threads to be on the same hole, one on the front and the other on the back of the sheath. Once you have that, you need to prep a new piece of thread with your two needles and start the thread two stitches behind where the loose threads you pulled out are. The idea is to double stitch the last two holes of the broken thread. Once you get about a half a dozen stitches past the break, cinch the broken ends by pulling both at the same time, you will feel them lock in. Then cut them off as close as you can. Continue your stitching till you get to the end.
If you can tell that you are not going to have enough thread to finish, just double back and double stitch two holes, cinch down the stitch and cut the thread flush. When you start the new stitch, you can double the first by starting one hole away from the last finished stitch, go back the one hole and then continue till finished. I try to conceal these kinds of doubled stitches in corners or anywhere where the stitching changes direction.
To finish your stitch, just back stitch and double the last three holes, cinch tight and cut flush. Run the over stitch wheel over the completed stitch to dress up the way that the thread lays. You are finished.
Any questions, please ask away.
Take care.

