|quoted:
Yep. Post some pictures. We always like that. <img src=' http://www.americanbladesmith.com/ipboard/public/style_emoticons//smile.gi f' class='bbc_emoticon' alt=':)' />
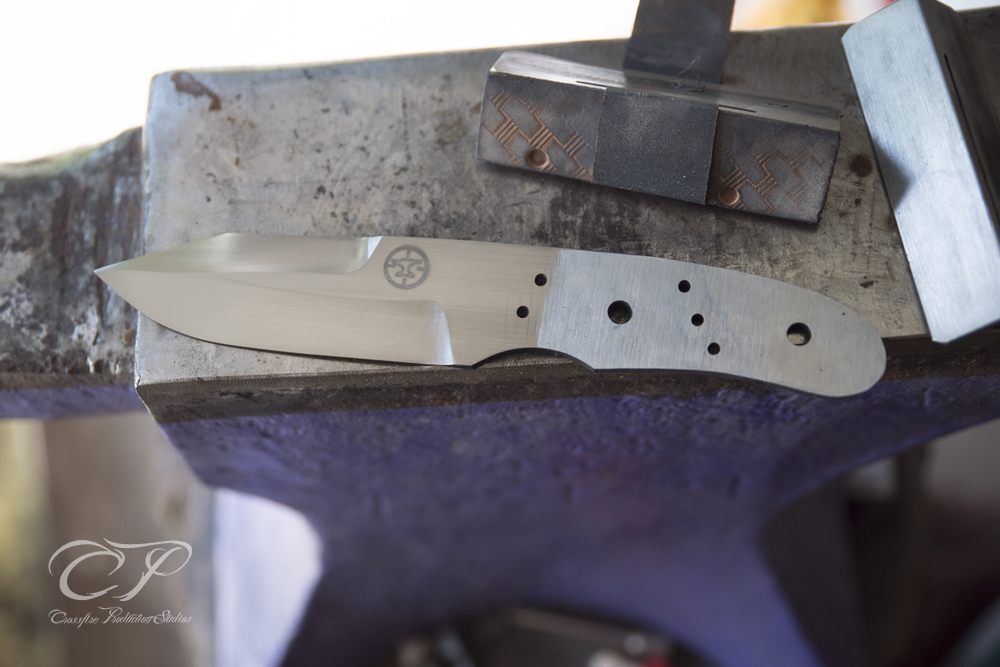
Along with what the guys have been saying, I use a flat, hard backing for about 80% of my hand sanding and switch to a leather backing for just long enough to smooth things out. For crisp line, don't roll the stick, just hold it steady as you pull.
Karl sent me a stick made of steel with a hard rubber backing that has really been nice to work with.
It might be nice for some photos of our sticks to be shown, but we need to say where in the process we use a particular stick. I'll try to after work.
I only took it up to 500, but it's going better. I did a better job on the second side than I did the first and had to step back down to 220 and do the second side again haha. Had to learn the new tool I guess.
Nicholas (or is it Nick?), I don't think anyone was offended by anything you said, so don't worry about that. Most knifemakers have a pretty thick skin (probably from setting themselves on fire a lot), and the problem with online forums is that the communication is very sterile. There is no inflection to the words, no facial expressions, or body language to read. Most people have no understanding just how much communication happens that is nonverbal when two people converse. So forum posts can be easily misunderstood, and quite frequently are.
That's a pretty nice little sanding tool you've made there. Very ingenious how you made it so you can auto-feed fresh grit to the working surface.
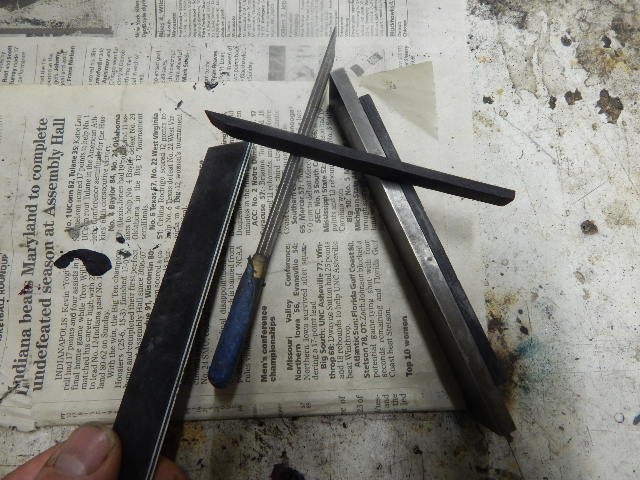
Here are a few that I use. These are my most used sticks and most have a specific purpose, some have multiple uses.
The little one on top is a wood one (I think it's ebony). It is about 1/8" thick and only about 3/8" wide. It has a sharply beveled point on one end.
The other three are all 1" wide and about 5 inches long. The one on the far left is a piece of engraver's plate. The next one over is a piece of 1/8" flat steel with a sharp beveled end and some padding on the other end. The last one is a piece of 3/16" precision ground O-1 with a strip of 35 durometer rubber (also 3/16" thick) epoxied onto one face.
I have a video of hand sanding a Bowie using all of these sticks in a variety of ways, with a variety of abrasives, for a WIP video series I'm making.
If you are so inclined, you can find it here: https://www.youtube.com/watch?v=2GiCKKPe-SA
Joshua States
www.dosgatosforge.com
https://www.youtube.com/channel/UCdJMFMqnbLYqv965xd64vYg
https://www.facebook.com/dos.gatos.71
Also on Instagram and Facebook as J.States Bladesmith
“So I'm lightin' out for the territory, ahead of the scared and the weak and the mean spirited, because Aunt Sally is fixin’ to adopt me and civilize me, and I can't stand it. I've been there before.â€
|quoted:
Nicholas (or is it Nick?), I don't think anyone was offended by anything you said, so don't worry about that. Most knifemakers have a pretty thick skin (probably from setting themselves on fire a lot), and the problem with online forums is that the communication is very sterile. There is no inflection to the words, no facial expressions, or body language to read. Most people have no understanding just how much communication happens that is nonverbal when two people converse. So forum posts can be easily misunderstood, and quite frequently are.
That's a pretty nice little sanding tool you've made there. Very ingenious how you made it so you can auto-feed fresh grit to the working surface.
Here are a few that I use. These are my most used sticks and most have a specific purpose, some have multiple uses.
The little one on top is a wood one (I think it's ebony). It is about 1/8" thick and only about 3/8" wide. It has a sharply beveled point on one end.
The other three are all 1" wide and about 5 inches long. The one on the far left is a piece of engraver's plate. The next one over is a piece of 1/8" flat steel with a sharp beveled end and some padding on the other end. The last one is a piece of 3/16" precision ground O-1 with a strip of 35 durometer rubber (also 3/16" thick) epoxied onto one face.
I have a video of hand sanding a Bowie using all of these sticks in a variety of ways, with a variety of abrasives, for a WIP video series I'm making.
If you are so inclined, you can find it here: https://www.youtube.com/watch?v=2GiCKKPe-SA
That beveled stick that you use with the micron paper looks really handy. I'm going to have to try something like that for the trouble areas.
Do you have different plates for your disc sander, and just swap them out, or are you changing paper on the same plate every time you change grits?
I'll echo what Lin said too. I think the key to keeping things crisp is paying attention to not only keeping your stick flat but also paying attention to what kind of pressure or torque you're putting on the stick. You can have the entire face of the stick touching the whole surface of your blade but still put eneven pressure on one side or another and wash out crisp lines.
I would also echo to use a hard, truly FLAT surface for almost ALL of your sanding especially at the coarser grits (220-600). If you're sanding from the get go with a soft or even semi soft backing, there's a big part of your troubles.
For me, that stick you made with angle iron would be VERY difficult to use and keep it flat and keep even pressure. That 90 degree 'wall' sticking up perpendicular to your sanding face seems like it would be a great (or not so great in this case) handle to apply extra leverage and torque where you didn't want it. BUT....if you can control it and it's working good for you, then go with it.
|quoted:
That beveled stick that you use with the micron paper looks really handy. I'm going to have to try something like that for the trouble areas.
Do you have different plates for your disc sander, and just swap them out, or are you changing paper on the same plate every time you change grits?
I change the paper on the disc. By the time I'm done at a specific grit, the paper is pretty much toast anyway. The only grits that I have useful paper left over are 60 and maybe 120. I do not use a lot of spray glue on the disc so the paper peels off easily and can be reattached, if I choose to. I have several discs, for different purposes though. I have a flat disc, a flat disc with a rubber face, a 1 degree beveled disc, and a flat disc with a very sharp edge for tight spots like on folders and guards. I also wanted to throw this out there, as I find people have different grit stages in sanding. I never go more than twice the grit per step and will usually go 1.5 times or less. In other words, if I am sanding at 220, my next stage will not be finer than 400, and usually is coarser, like 320. The next step after 320 is 400, not 600. From 400 I go to 600. It's just easier to remove all the scratches from a previous grit when the difference between stages is not so drastic. It may seem like more steps equals more time, but it doesn't. The narrower step changes go much faster.
Joshua States
www.dosgatosforge.com
https://www.youtube.com/channel/UCdJMFMqnbLYqv965xd64vYg
https://www.facebook.com/dos.gatos.71
Also on Instagram and Facebook as J.States Bladesmith
“So I'm lightin' out for the territory, ahead of the scared and the weak and the mean spirited, because Aunt Sally is fixin’ to adopt me and civilize me, and I can't stand it. I've been there before.â€
|quoted:
I change the paper on the disc. By the time I'm done at a specific grit, the paper is pretty much toast anyway. The only grits that I have useful paper left over are 60 and maybe 120. I do not use a lot of spray glue on the disc so the paper peels off easily and can be reattached, if I choose to. I have several discs, for different purposes though. I have a flat disc, a flat disc with a rubber face, a 1 degree beveled disc, and a flat disc with a very sharp edge for tight spots like on folders and guards. I also wanted to throw this out there, as I find people have different grit stages in sanding. I never go more than twice the grit per step and will usually go 1.5 times or less. In other words, if I am sanding at 220, my next stage will not be finer than 400, and usually is coarser, like 320. The next step after 320 is 400, not 600. From 400 I go to 600. It's just easier to remove all the scratches from a previous grit when the difference between stages is not so drastic. It may seem like more steps equals more time, but it doesn't. The narrower step changes go much faster.
Absolutely. Hand rubbing is not fun for me haha. I'd rather blow through $20 in sand paper then suffer trying to push too high a grit too soon.
So far my routine is to get the blade up to 220 on the belt, maybe A45 or A30 if I'm feeling brave. Then go 220, 320, 500, 800.
I need to find what works for me for going 45 degrees. Those blocks I made are really good for lenghtwise, but don't work great at anything else.
Any advice on paper brands/types, specifically for hand rubbing metal? So far I've been grabbing whatever and just going with it. The no-name stuff that Jantz sells is really good for the price. The wet dry for metal is pretty good and the no-load stuff for wood last a really long time. And I mean you can literally use one strip of each grit for the entire knife handle, and it still has bite. The stuff at Lowes hasn't been great. 3M seems to be pretty good from what I've used so far. I just want whatever works faster. I don't care if it lasts only 10 passes as long as it cuts quick.
I like the 10x 3m you can get a home depot for under 400 grit and Rhino wet red line for 400 and up. the rhino wet is hands down the BEST paper I have ever used but i find if you dont use it wet it doesnt cut as well where the 10x will and i prefer to do up to 220 dry.
my progresion is most of the time 400 on the grinder back to 220 hand, then 400-500-600. If i only og to 220 on the grinder I start with 120 hand.
I think there's a thread here somewhere about what types of sandpaper people use, but I can't seem to find it.
I also use the 3M 10X up to 220. also at 220 I like Mirka blue which I get from Woodworkers Source. I use silicon carbide paper for 320, 400, and 600.
I use 3M micron with the mylar(?) backing in 60, 40, 30, 15, and 9 micron. For really fine grits like 1000, 1500, and 2000, I buy the stuff at autobody supply stores.
I have some of the Rhinowet products, but I haven't put them to anything yet so I cannot vouch for their performance. They do seem to be popular with a lot of makers.
"I need to find what works for me for going 45 degrees. Those blocks I made are really good for lengthwise, but don't work great at anything else."
Get a flat piece of precision ground steel. You can use that for both directions. Lay a piece of 1" wide paper along the face and grip it at both ends between your thumbs and the knuckles of your index fingers. You can sand in any direction you like.
Joshua States
www.dosgatosforge.com
https://www.youtube.com/channel/UCdJMFMqnbLYqv965xd64vYg
https://www.facebook.com/dos.gatos.71
Also on Instagram and Facebook as J.States Bladesmith
“So I'm lightin' out for the territory, ahead of the scared and the weak and the mean spirited, because Aunt Sally is fixin’ to adopt me and civilize me, and I can't stand it. I've been there before.â€
I've read through the responses.
I think one of the challenges is rolling over the ridge line is using any kind of soft backer.
Where a hard backer will only roll if we roll it while sanding.
A soft backer is made to contour to the blade.
So even if we are sanding lengthwise to the blade that soft backer will contour over the ridge and soften the line.
This can also happen in the grind.
One of the the things I remind myself of its not important that we are making two flat planes meet.
Japanese swords are convex faces.
Though subtle they are slightly curved and come together to make very crisp ridge lines.
Which are worked on stones and then traditionally above the ridge they are burnished.
A final thought is that when I sand to a ridge if I am sanding lengthwise with say 220 on the bevel then I sand diagonal on the flat or opposing bevel on a false edge or dagger bevel.
This way I can see how the scratches are meeting at the ridge.
I also polish under a magnified light.
JJ makes a good point. Good lighting and magnification are critical.
Joshua States
www.dosgatosforge.com
https://www.youtube.com/channel/UCdJMFMqnbLYqv965xd64vYg
https://www.facebook.com/dos.gatos.71
Also on Instagram and Facebook as J.States Bladesmith
“So I'm lightin' out for the territory, ahead of the scared and the weak and the mean spirited, because Aunt Sally is fixin’ to adopt me and civilize me, and I can't stand it. I've been there before.â€
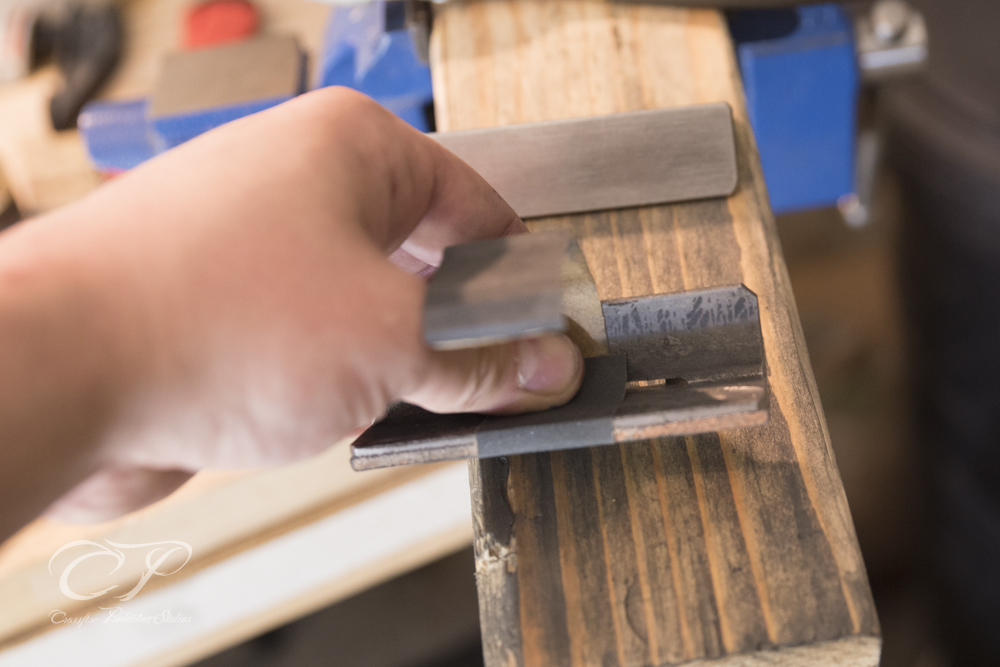
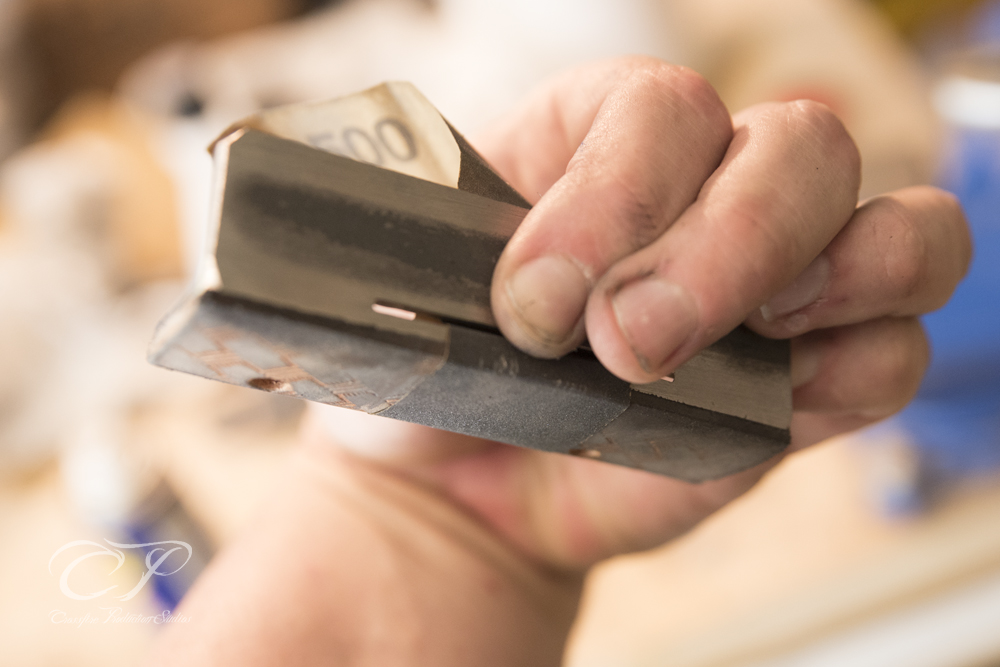
Best things to use for hand sanding/rubbing are planer blades & a piece of 1/4"-3/8" thick x 1"/ 1-1/4" wide oak strip with a thin piece of leather glued to it. The oak strip is beveled like the planer blade for getting into the plunge line area. If it shows the picture below is the type of blade I use, knock the sharp edge off. Most any cabinet shop should have a few of these around that are past being resharpen-able

I would add a small suggestion. I take my knives up to 400 grit on the grinder and then begin hand sanding at 320 going up to 800 grit. Going back to 320 just helps to get out any grinder scratches I missed. I use several widths of micarta draw sticks ranging from 2 inches to 1 inch. Changing the widths seems to help up close to the ricasso. The one thing I am adding to the discussion is that I glue cork to my finish draw stick. While most of my blades are flat ground there is a taper to the edge that goes back a little over an 1/8 inch from the edge. The cork on the draw stick allows me to control pressure on the final 800 grit finish. I have found fewer mistakes occur using this technique.
Dan
I'm definitely less experienced then the majority of the posters, but there are a couple of things that worked really well for me.
1) This one I took from Nick Wheeler's sanding videos - use sandpaper with adhesive backing. You can get it in any auto supply shop and it's a lifesaver, especially at the first grits when you are just making sure everything is nice and flat. Just glue it onto your piece of steel and sand away.
2) This one relies on having a belt grinder with at least a 2-inch belt. Once you messed up your crisp lines hand sanding, you can restore them by slapping your knife on the magnet and carefully pressing it to the platen with a tip up or down. The trick is not to rock it left or right, but just push it flat against the belt. It's a bit tricky and your grind lines from the belt will run along the knife, not perpendicular to it, but it definitely allowed me to restore the crisp lines a few times.
|quoted:
I change the paper on the disc. By the time I'm done at a specific grit, the paper is pretty much toast anyway. The only grits that I have useful paper left over are 60 and maybe 120. I do not use a lot of spray glue on the disc so the paper peels off easily and can be reattached, if I choose to. I have several discs, for different purposes though. I have a flat disc, a flat disc with a rubber face, a 1 degree beveled disc, and a flat disc with a very sharp edge for tight spots like on folders and guards. I also wanted to throw this out there, as I find people have different grit stages in sanding. I never go more than twice the grit per step and will usually go 1.5 times or less. In other words, if I am sanding at 220, my next stage will not be finer than 400, and usually is coarser, like 320. The next step after 320 is 400, not 600. From 400 I go to 600. It's just easier to remove all the scratches from a previous grit when the difference between stages is not so drastic. It may seem like more steps equals more time, but it doesn't. The narrower step changes go much faster.
I see you have the disc grinder as well. I use that grinder on every knife I make. I also have the flat and beveled disc for various applications.
Jim
I have changed my process in the last 4 years.....slight changes, with significant differences.
I still use the disc a lot, but I have incorporated new techniques and I use some of the Rhino paper others in this thread suggested.
I rareley use that 3M mylar backed belt anymore. I do use Trizac belts now.
It should be noted that Rhino Wet makes two grades of paper. The Red line is AO abrasive while the Black Line is SC abrasive.
AO = Aluminum Oxide SC = Silicon Carbide
Joshua States
www.dosgatosforge.com
https://www.youtube.com/channel/UCdJMFMqnbLYqv965xd64vYg
https://www.facebook.com/dos.gatos.71
Also on Instagram and Facebook as J.States Bladesmith
“So I'm lightin' out for the territory, ahead of the scared and the weak and the mean spirited, because Aunt Sally is fixin’ to adopt me and civilize me, and I can't stand it. I've been there before.â€

