
Our new topic for discussion this month is hamons. This is a japanese term for the actual line on the blade. Yakiba refers to the whole hardened portion of the blade.
The hamon is the demarcation line between the hard martensitic portion of the blade and the softer, hopefully pearlite portion of the blade. The japanese have done this for centuries on their blades and have numerous different styles of hamon. Some examples would be "suguha" which is basically a straight hamon, "notare" which is gently undulating, "choji" which is like the clove blossom, or even "kiku-sui" which is chrysanthemum blossoms floating in water. There are hundreds of variations.
This months topic will deal with. What materials do you use? Such as steel types, clay types, and quenching mediums. Also how do you bring the hamon out. Such as etching techniques, blade preparation, and polishing.
Also any tips on hamons that you have.
We look forward to seeing the replies and your methods. Of course pictures are great, under 50kb and less than 640X480.
Brion
Brion Tomberlin
Anvil Top Custom Knives
ABS Mastersmith
G'day All
I have to say I am a bit hesitant to be the first to jump in here as there are those way more experienced with this than me. There are a few things that have made a vast difference in my hamons, the biggest would have to be oil. I was very happy with a medium fast oil for edge holding and straight hamon lines in the steels I work(W2 and 1084). However, I could not get much activity in clay quench blades until I went to a dedicated fast oil. I am now using Houghton's
"Houghto Quench K". The difference is like chalk and cheese. Heaps more activity and detail with almost all other processes the same. One change ,I now add a normalizing cycle after the rough grind. With the faster oil, I started to get a slight warp in the quench, I believe this could be from released tension in the rough grind showing in a faster quench. Whatever the cause the extra normalizing cycle has taken it out. For clay, like most, I am using Satinite.
I am using many of the polishing techniques that John White has discussed with me. This is off topic but John is like blue masking tape, what would you do without him? <img src=' http://www.americanbladesmith.com/ipboard/public/style_emoticons//smile.gi f' class='bbc_emoticon' alt=':)' /> Polish the blade to 1500. Short etch cycles in Ferric with a polish in between each cycle. I have had to adapt to local materials as many of the polish compounds and cleaning products are different here. I use Rotten Stone(available from wood working shops, it is not the same as pumice even 4f pumice is way coarser) and water between each etch. This will clean off oxide but has little to no abrasive effect on the blade itself. If the blade is kept wet and well rinsed there is no degreasing needed between cycles. The final finish is with rotten stone and oil in a slurry on a cotton pad. I also use Maas polishing cream. There is possibly a different finish for every bladesmith and blade out there. I have yet to use AO powder but do have a 50 lb. bag on order from Ebay. The trick now that they look half decent is to photograph the things. That seems to be more difficult than doing them in the first place.
Like I said, there are those out there way more experienced than myself but hope this helps.
Cheers
Shawn
i've been trying to figure this hamon thing out for quite a while. Like Shawn, there's been a few real 'aha!' moments when I changed from what I was doing to something else.
Here's a few key things for me;
-Stopped messing with steels that either don't work, or could work with some weird techniques. Got away from 5160, 01, 52100, L6, etc. and took up 10xx series or W1 or W2, with W1 being my prefered steel these days. Reason? Availability, cost, and performs well.
-Stopped messing with water quench. While I think water is a very viable quench medium for certain steels, I got sick of cracking blades. I went to Parks 50 and would be upset if it went missing. Keep in mind that I'm dealing with long blades, swords and such. A bowie or hunter might come out fine in a water quench. I think this is a problem with our modern steels, specifically manganese content, so if and when I make my own steel, may go back to water.
-My personal preference for clay is Rutlands furnace cement, the black stuff. I used Satanite for years but had the issues with it falling off, though not bad, and I didn't like how gritty it was. When I thin the Rutlands with water, to the right consistancy, it's just nice and smooth, which makes detailed application nice. It also sticks like a son-of-a-gun, solving two problems I had with satanite. The Rutlands does puff up when taken wet to the forge for heat treating, but it's just disconcerting, still get great hamon.
-The polishing thing is on-going. I've done the vinegar, lemon juice, ferric, water stone, etc., and they all have thier place. My quick and easy polish is to take to 1500 grit, etch in very dilute ferric (10 to 1 maybe) for only a minute or so, clean off oxides with 1500 grit, and repeat as necessary. There's always something new to try, like the loose abrasives I'm hearing about.
Hope this helps some.
Dan
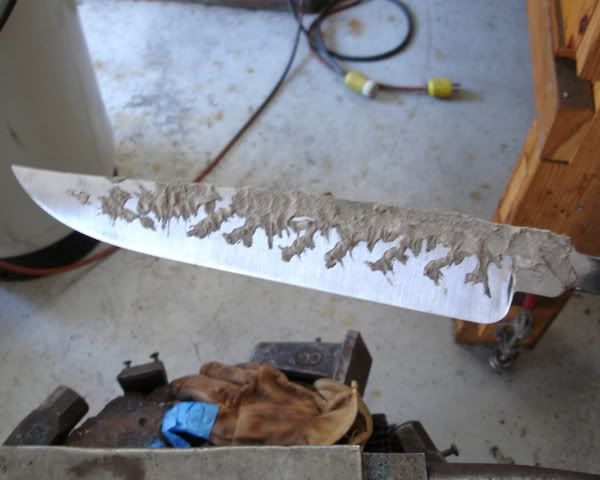
It just so happens I was doing the final polish on a small Bowie this morning so here goes. I hope the attachment is the right size, thanks to Steve Culver for the tutorial. This is polished to 1200, etched for several cycles then polished at 2000, several more cycles in ferric then polished with rotten stone in an oil slurry, and finally a rub with Never Dull(strange but true), it seems to brighten a few things up. This is a fairly dark mat finish which I like and is not quite so touchy if you breath on it too hard. It is not optimal for very small detail or Ashi. For the photo, I used the hold it in one hand and shoot with the other while playing with the light. Also not optimal.
Like Dan I had trouble with the Satinite falling off. I now let it dry over night then bake it in the oven at 400F for an hour before the quench, sticks like snot on a blanket now. Will have to have a go at the Rutlands sometime.
Cheers
Shawn

Shawn
Thank you for the very informative posts! This is going to be one of our best topics.
It is 8:25pm in Colorado now and I see that you just posted a few minutes ago. Sally checked her "Planets" app on her IPAD and we can see that it is daylight in Australia now. The ABS Forum has really helped all of us in the ABS to be able to communicate around the globe!
Dan Cassidy
Journeyman Smith
Send an email to Dan

Well, Brion called and told me to get off my duff and add something, so here goes.
I'll confine my comments to W-2, since it's what I use, and it's now readily available. I'm forging down big rounds from Don Hanson, but Aldo Bruno, ( www.njsteelbaron.com ) has W-2 in bar stock. Not only does W-2 show great hamon activity, but it makes a fine working blade as well.
The W-2 we're talking about is a hyper-euctectoid steel, .95% C, and to make a good working blade should be treated as such. It wants to be forged between 1400 -1900F, hot for the major work, and at the lower end for final surfacing, but not below 1400 ( a good dull red.) After forging, it should be normalized to remove residual stresses by heating to 1600 F, and air cooling to ambient in still air. Normalizing will also begin to even out grain size. Additional normalizing heats at stepped down temps will refine the grain, and further reduce stresses. I'll do three grain reduction normalizing heats, at 1475, 1450, and 1425F, allowing the blade to cool to about 800F (black heat) between cycles. The hamon results from the shallow hardening nature of W-2, and finer grain will enhance this effect, as well as improve working performance.
Before rough grinding the blade, it'll need to be softened. The hyper-euctectoids don't like slow anneals from austinizing temperatures. They will tend to concentrate carbides in the grain boundaries if slow cooled from austinizing temps as an anneal.It is better to normalize in air ( moderately rapid cool), or even quench in a slow oil, and then go to a sub-critical heat. Bringing the blade to 1200F and holding for a hour, followed by air cooling in still air, which will leave a semi-spheroidized structure that'll grind like butter, and still leave the steel in proper shape for hardening.
After rough grinding, and before hardening, it can be a good idea to do an additional stress relief cycle, bringing the rough ground blade to between 1100-1200, holding for an hour, and air cooling. This step will reduce warping in the quench, and help eliminate the scratches that Shawn mentions in a later post. We're doing really weird things to the steel with the mixture of crystalline structures in a hamon, and it needs all the prep help we can give it.
This may seem like a round about way to discuss making a hamon, but the pre-heat treatment sets the steel up for both the visual and performance aspects we want.
As mentioned, W-2 is a shallow hardening steel. In order to make martensite, it'll need to drop from hardening temp to about 800F in less than 1 second. This means quenching in water, brine, or a fast quench oil such as Parks 50. Luckily for those of us who can't stand the "tink" of cracking steel, Maxim Oil ( www.maximoil.com) has P-50 at reasonable cost in 5 gallon pails.
Next in line, W-2's hardening temperature range is 1425 to 1475 F. Austenizing over1475 F will again tend to leave carbides in the grain boundaries, and/or leave retained austenite. As a side benefit, lower austenizing temps make a better hamon. I've been hardening out of 1440F.
Finally, the clay. Claying the back of the blade creates an insulating barrier, slowing down the cooling of the clayed area, and preventing the steel underneath from becoming martensitic.The back goes to pearlite, and the hamon itself, at the pearlite-martensite border, becomes a mixture of crystaline structures.
Details:As Don Hanson says, the secrets are, W-2, less heat. less clay, Parks-50, more practice.
I'll put the clay on at less than 1/16 inch thick. I use satanite mixed with water to suit, and applied to a clean, de-oiled blade.I'll go directly into the forge while the clay is wet. If the blade is clean, satanite will stick through heating and quenching, and in fact will have to be cleaned off with a brass brush after hardening.
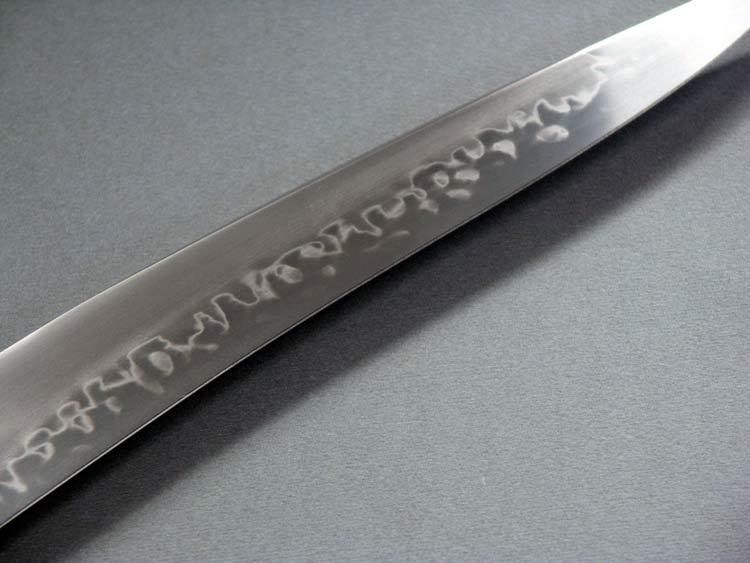
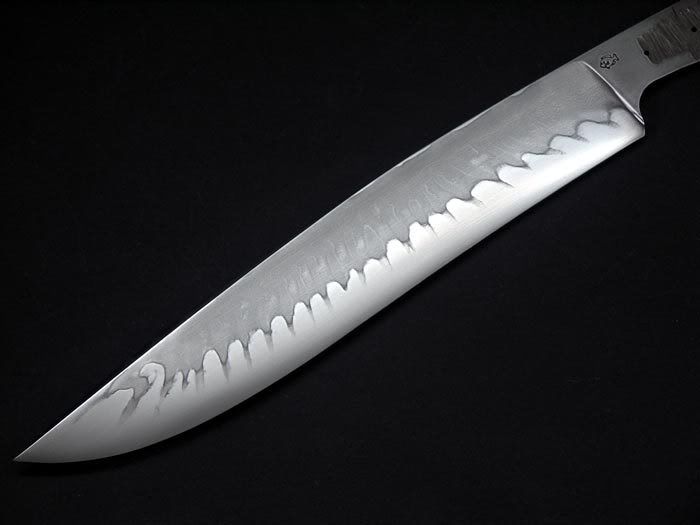
Here's what a typical claying might look like.
I'll bring the blade up to 1440F, soak for 5-8 minutes, and plunge tip first into Parks-50, using a slicing movement for agitation substitute. I'll hold in for 3 seconds, out for 3 seconds, and back in for 8-10 seconds. This will allow the edge to drop through the "nose', then slow down the transformations for reduced stress, then continue cooling the clay to prevent heat from re-heating the edge.
After the blade cools,and is cleaned. I'll temper twice. I'm tempering at 450F, for appx. RC 58-59.
I'm hand sanding to 1500 grit, then etching in Ferric chloride, in a 1:4 mix with water.
I'll etch for about 8 seconds, neutralize with Windex, and clean off the oxides with Flitz and a flannel cloth. Depending on how complex the hamon looks, anywhere from 4 to 12 etch cycles seems to work. The more ashi, or wisps below the hamon line there are, the more etch cycles seem to be worthwhile.
After etching, I'm polishing with 1500 grit silicon carbide powder, ( Ebay ) using make-up removal pads and Ballistol for lubricant.
Polish 'til you get tired of polishing, or it looks good to you, whichever comes first.
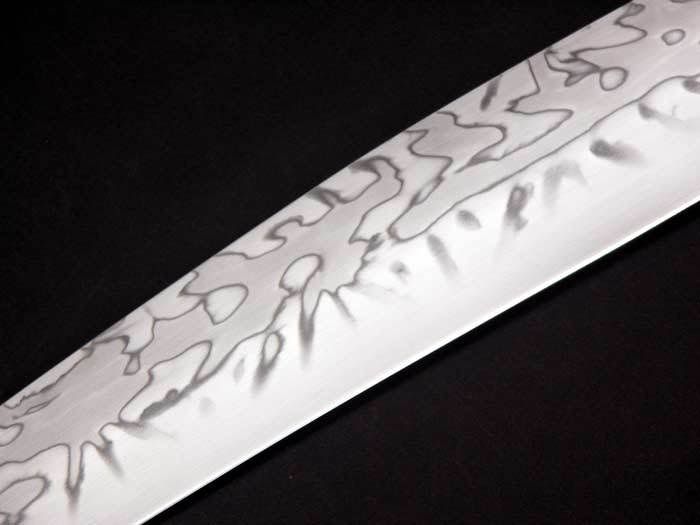
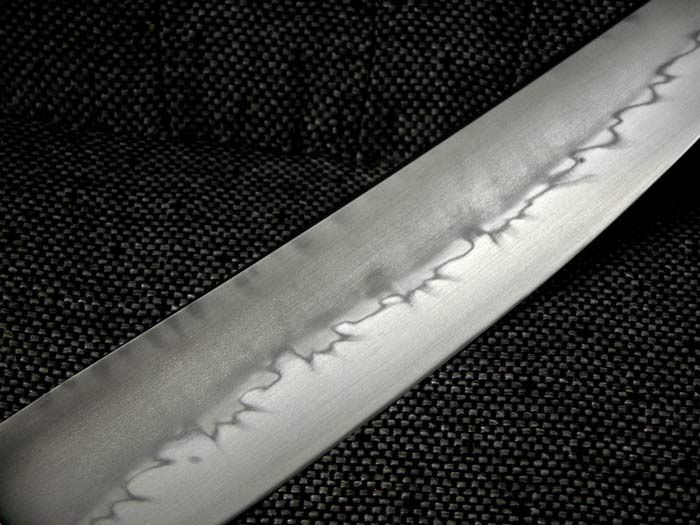
Here's what that clayed blade looked like after polishing:

Well, Brion, here it is.
John
John, thank you for adding your tips and techniques, beautiful blade by the way. Also Shawn thank you for adding your methods and welcome or should I say G,Day. Dan, thank you for mentioning the rutlands cement. I know it is easier to get for some people and will work.
I am also using W-2 for my main hamon blades, although I have used 1095, 1084, 1075, and 1065. Right now the main steel is W-2, a little left of Don's and the rest from the steel baron.
Like John I also do normalizing cycles in the same sequence as he does. Then a sub critical anneal.
I have also found lower temperatures and less clay work better. I also use satanite, however I do a wash of the whole blade with a very thin mix of satanite, then proceed to the main clay coating. Also I have never had problems with the satanite falling off. You need to make sure your blade is CLEAN before applying the satanite. I usually leave my blade at 120 grit before heat treating.
I am also using parks 50 with W-2 and 1095. One interesting note, blades that are water quenched have a tendency to curve upward when quenching, with oil they will have a tendency to curve downward. Maybe Kevin can give us an explanation of why this happens. But if you are wanting a certain curvature in your blade you have to take this into account.
After the quench, I clean the blade with a 120 grit trizact belt. This allows me to check the hamon and see if it is what I was after. Then into the tempering oven at 450 degrees for two two hour cycles. This is for W-2.
I then will do the finish grinding and hand rub to 1000 to 1200 grit. I then thoroughly clean the blade with acetone and dawn dishwashing soap. I also use a series of etches in 4 to 1 ferric of about five seconds each, until I get the effect I am looking for. I use 3M auto body rubbing compound, medium cut, which is 1200 grit for cleaning the oxides off the blade in between etches. After the final etch it is the 3M again, followed by Flitz polish, then I use a pumice rated at 4F which is very fine backed with kleenex and WD-40. I will repeat this step until I get the look I want, Yes it is time consuming, but when you get one done it will make you smile and go wow.
I am still experimenting and hopefully can get closer to the hamons we see on japanese blades.
Brion
Brion Tomberlin
Anvil Top Custom Knives
ABS Mastersmith
Dan, from over here I am always a day ahead, but it means I am always a day short when I get ready for a show! Ditto on the normalizing and sub-critical annealing on W-2. Not only does it benefit both the Hamon and performance but saves belts and drill bits. In fact, for all those who are wanting to try Hamons, cut and paste John's post and hang it on your shed wall. In time you will find little things that work differently for you, but you could not ask for a more detailed platform to go from.
One thing I failed to mention about doing a post rough grind normalizing cycle is scratches. I was having coarse grind marks coming out in the etch in unhardened sections of the blade. It was driving me mad. I was having a chat with Kevin Cashen at Blade one year and mentioned it to him. The scratches were not in the surface, they were raised above it, what looked like 40 grit marks could be rubbed off with 1200 grit paper. Do another etch and out they come. Kevin explained (and trust me this is a paraphrase) that residual strain at the bottom of the v formed by the grit cutting the steel was effecting the rate at which the steel etched at that spot. In other words it was deformed under the surface and being in an unhardened section of the blade had not resolved itself during the quench process. I am using a forge when quenching clay hardened blades. My thought is that while the edge of my blades are at hardening temp the section covered by clay is not fully transformed, therefore the strain marks remained. Cut a long story short(too late), full normalizing before the hardening and the marks are gone. I still owe Kevin a drink on this one.
Cheers

This is an awesome thread! Thanks to all who have posted information on this process!
Shawn thanks for bringing that little bit of information up. Now I know why I was having that problem. Kevin is the man. Great thread and some great information.
Brion
Brion Tomberlin
Anvil Top Custom Knives
ABS Mastersmith
Just received a question from one of our members about the availability of Parks 50 from Maxim Oil.
I should have pointed out that Maxim manufactures quenching oils, but also sells Heatbath products, including Parks 50. They don't list it however, on their site. You'll have to call the number listed and ask specifically for Parks 50.
Parks-50 is a 7-9 second oil, on the ball test, vs the 11-12 second oils commonly referred to as "fast" oils. (The ball test is an industry standard not referring to the "speed past the nose" of the TTT diagram.)
When I bought recently, it was about $75 for 5 gallons, plus shipping.
John
Master Smith Jim Crowell wrote the following article for the American Bladesmith Journal and the ABS Website on temper lines and Hamons. Thank you for the advice Jim.
Creating a Temper Line or Hamon
By Jim Crowell, Master Smith
This is an explanation of how I create a simple Japanese style Hamon or temper line. It has occurred to me over the years that it is far better to only austenize the part you want tempered than to austenize the whole blade and then attempt to localize the “hardeningâ€. It was apparent in several test specimens of the latter that hardening occurred far above the immersion line and was not reliable.
I have used 1084, O-1, 1095, L-6 and 5160 all with varying degrees of success. I am still learning about this myself and do not profess to be an “expertâ€. However, heat treat is one of the quixotic intangibles that are hard to prove. If a guy says to me “I can cut ten 1inch ropesâ€, I can say, “Show me.†Unfortunately it is not so simple with heat treat. I will want to know about some exotic heat treat when it has been demonstrated to me unequivocally that it is producing a superior blade; otherwise I really do not want to hear about it.
This process, to me, is simple to understand and hard to accomplish. (It is like going on a diet and exercising; easy to understand but hard to do.)
This process requires some skill with a torch and recognizing the thermal/ color relationship in the steel. Not only must you know what “critical†looks like but also know when you can quench as the temperature and color drop. It is very easy to overheat the blades and I have ruined many. I am confident with this method as done by myself and have made many test blades at Hammer-ins and the ABS School that were used with excellent results. I have also heat-treated competition knives in this fashion and have never had one fail.
I select a torch tip that appears to be adequate for the size of the blade. I grip the blade by the tang with vise grips, making sure it will not move while being moved rapidly. The quenchant is warm and near at hand. I dim the lights in the shop and set the torch to a medium flame for the chosen tip. If you have too small a tip it will take forever and will probably harden spottily. If the tip is too big it will “wash out†the wavy line/s you are attempting. The idea is to have an undulating, cloudy line that wraps the point in some fashion. I very much prefer to harden 1/3 to ½ of the blade. I do not anneal and therefore the spine of my blade has a bit more resilience than an annealed blade. If you anneal it is all the more important to harden farther up the blade particularly with blades that are thinner.
Holding the blade with the vise grips I pre-heat the ricasso area as well as the spine near the point. These are the areas with the most mass and will suck the heat out the fastest. Also it is unacceptable to have the temper line “run out†prior to traversing the entire cutting edge. I have seen many examples where the last inch or so near the ricasso is was not properly heat-treated. (Hardened)
Now I slowly and evenly maintain the heat in the ricasso and point spine while “filling in: between them. So far so good; from here it is a cinch to have a nice straight line. But to make the waves; When the blade is near “critical†heat I start to undulate the torch going from one side of the blade to the other as evenly as I can. They never seem to come out evenly although I try to make the waves the same on both sides. The trick is to have everything the right temperature at once, which is hard for me and then get it in the quench tank in that instant. Let it cool a little after quenching and then grind it to see what you got. If you like it go on and finish the knife. If you do not like it…then do it again. So long as you did not overheat it you can do it again. Very important to have the ricasso area up to heat as this is a real stress riser area. (Now how do I know that?) Draw the temper in whatever manner you like. I treat blades hardened like this the same as my other blades: I draw the overall temper, tang and spine just like my other blades.
Sometimes I dunk it in Ferric Chloride to get a peek. Then, I finish grind and polish by hand to 600 grit. At this point I immerse the blade in PCB etchant (Ferric Chloride, not that other stuff.) Sometimes I rub it out with the 1000 grit automotive wet dry paper and then use the back of the paper. Try different papers and grits and see what you think looks good. Be sure to wash the Etchant off the blade first, as this stuff is quite corrosive.
Be careful of the blade now as you can’t just sand it or buff it at this point or you will ruin the etched finish you just spent so much time creating. I have the shoulders finished and the guard ready prior to etching.
Good luck,
Jim Crowell
Master Smith

Dan Cassidy
Journeyman Smith
Send an email to Dan
Dan, thanks for posting Jim's method. I have seen Jim do this and he gets very good hamons with it. Just goes to prove there is more than one way to do something.
Brion
Brion Tomberlin
Anvil Top Custom Knives
ABS Mastersmith
Not much I can add here. I pretty much do it like most have posted and closest to what John White wrote. That's a fantastic lookin blade, John!
I caught the hamon disease from Don Fogg years ago. He is the Master! But I was unable to get 1095 to act like he did. I tried a bunch of different steels, W1 drill rod was real close to what I wanted though. Howard Clark was a huge help at this point. I finally settled on a batch of W2 that stood out from the rest, so I bought most of it. The first W2 I tried didn't cut it. The next big revaluation was Part's 50 quench oil. Then a whole lotta practice. With the right steel, heat cycles, clay, temps and quench, I found the sky is the limit. Where ever I put clay, it left a mark. <img src=' http://www.americanbladesmith.com/ipboard/public/style_emoticons//biggrin.gi f' class='bbc_emoticon' alt=':D' /> Fun stuff!
Don Hanson III
Perhaps someday I'll have something constructive to add, but for now I'm just extremely grateful for what you all have shared. And Mr. Hanson-"wow" keeps coming to mind each time I look at those pictures....
Jeremy
Jeremy Lindley, Apprentice Smith
