
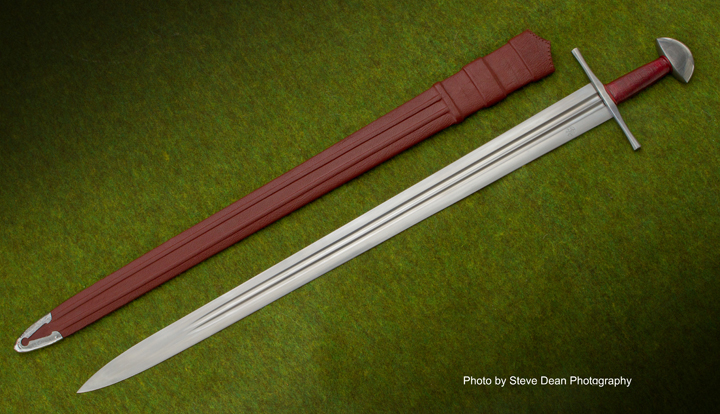
The medieval sword found in the river Witham is one of the most recognizable treasures at the British museum: http://www.britishmuseum.org/research/collection_online/collection_object_details/collection_image_gallery.aspx?assetId=296785001&objectId=36133&partId=1
A few years ago I had the rare privilege of spending an afternoon measuring and studying it first hand, and I had a feeling then that it was something special. Recently a good customer got his turn at having me make something and asked if there was something I would like to do (as I said, he is a good customer). This was my opportunity to try my hand at the Witham and get paid for doing it, so when he said that he loved that sword the fun began! I always thought that the original’s gaudy inscriptions were a distraction from its phenomenal lines and proportions, and so when I suggested that we go with a cleaner and more weapon-like version, my customer was on board and even suggested a brazil nut pommel to keep with the theme. This was going to be fun since it would also test my skills at redesigning what was perhaps a perfect medieval weapon with a slightly different hilt and pommel while still keeping the same flawless dynamics of balance points and center of percussion etc…


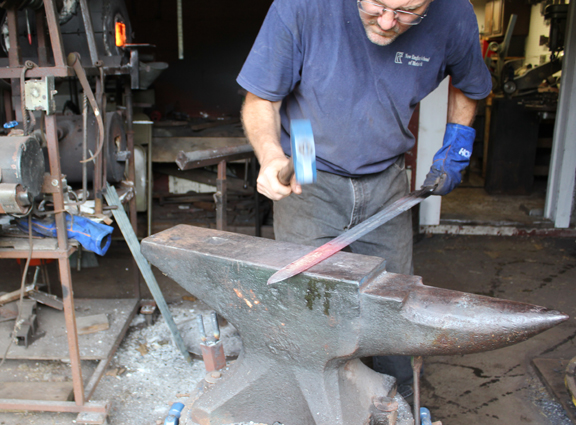
There was no decision to be made regarding blade material, it would, of course be my trade mark Crucible formula L6. But I found one of the biggest challenges of this blade immediately in the forging process- those narrow double fullers. I forged two blades to get the proportions of those grooves right and discovered a nasty twist that they gave to the process, and I say “twist†not just metaphorically! Those fullers acted like two “I†beams running down the blade causing any subtle strain imbalance to pull the blade in every crooked direction possible. It took longer to normalize the blade than it did to forge it, and the heating and cooling had to be exact.
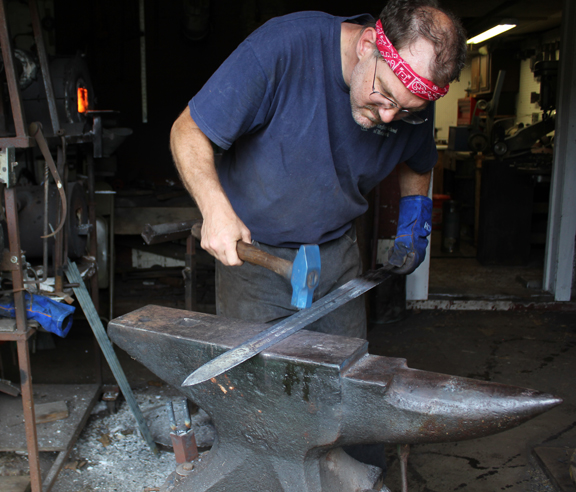
But once forged, grinding the blade was a pleasure, it always is when doing these exact recreations because you can feel the blade come alive in your hands as you shave off each thousandth of an inch closer to the original. I knew that the tapers and cross sections of this blade were something unique, but I was not prepared for the feel of it in the hand. I have worked with many really effective weapons that were the Hot Rod Fords or Chevy’s of their time, but the Witham is a Ferrari! Point tracking is so dead on that if a trained knight aimed it at you, your earthly affairs had better be in order, and yet this quick blade would cut like a laser.
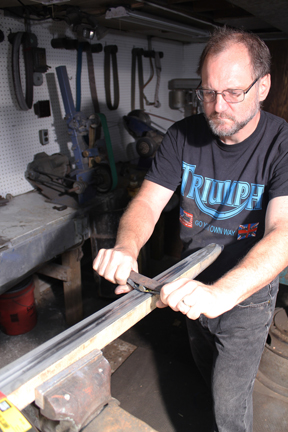
Polishing was not too bad either, since the planes of the blade were all broken down into convenient narrow sections that gave up their scratches in short order. And those fullers reflected the light in a way that created great lines and almost Art Deco sleekness to the blade; I was so glad we didn’t go with the inlayed inscriptions.
For the cross and pommel we chose wrought iron, which completed the battlefield workhorse theme. The scabbard was tradition wood wrapped in a maroon goatskin bookbinding leather from a new supplier that I like. The chape took longer to make then the entire scabbard, since I hammered it out of sheet steel. Normally I would use non-ferrous, which raises and domes quite easily, the steel was much more ornery and required a bit more hot work, but in the end the hammered finish of the steel went well with the overall theme.
"One test is worth 1000 'expert' opinions" Riehle Testing Machines Co.
Wow, Nice work Kevin! Ferrari is right.
Russell

That is great Kevin! I like the look of the brazil nut pommel and straight cross guard. What is the weight on it? It looks light and fast. Excellent work!
Brion
Brion Tomberlin
Anvil Top Custom Knives
ABS Mastersmith

Kevin
Outstanding work! Thank you for taking the time to post.
Dan Cassidy
Journeyman Smith
Send an email to Dan


That is a beautiful project.
I really appreciate your thoughts about the forging an how the forging of the fullers affected the straightness.
May I ask you to share further your thoughts on the forging?
What are the general sequences of the forging steps?
If you were to forge another, would you change any of your sequence or techniques, especially regarding the fullers?
At what stage did you put in the fullers?
|quoted:
That is great Kevin! I like the look of the brazil nut pommel and straight cross guard. What is the weight on it? It looks light and fast. Excellent work!
Brion
Thanks Brion, the weight of the replica is 1,135 grams. Going with the brazil nut instead of the round pommel on the original required shifting the mass distribution in order to maintain the original center of percussion and other dynamics. Handle length was changed to compensate and thus lost around 75 grams of overall mass from the original. In the end it all made it a much more ferocious single handed cutter.
"One test is worth 1000 'expert' opinions" Riehle Testing Machines Co.
|quoted:
That is a beautiful project.
I really appreciate your thoughts about the forging an how the forging of the fullers affected the straightness.
May I ask you to share further your thoughts on the forging?
What are the general sequences of the forging steps?
If you were to forge another, would you change any of your sequence or techniques, especially regarding the fullers?
At what stage did you put in the fullers?
Hello Lin, as with all swords I always forge the fuller in before any bevel work. You definitely want to completely profile the blade blank because if you do heavy metal moving on that plane after the fullering you will just crush and distort the fullers. The fullers will never be as straight and as perfect as you would like but saving the bevels for afterwards allows you to let the bevels pull everything straight and crisp things up. A single fuller is not too much of a challenge but the double fullers brings the blade cross section down much flatter with almost double the points of drastic change in cross section, thus, if you heat or forge unevenly in any way it pulls things out of alignment quite a bit more. The problems this causes on normalizing is that what is crooked at one temperature can be straight at another, so you need to predict where things will be at room temp and compensate. It is easier to understate the fullers and leave more room to cut them in deeper after forging. Of course, both forging and grinding on the bevels will narrow them so this once again can work in your favor.
"One test is worth 1000 'expert' opinions" Riehle Testing Machines Co.
