
Nowadays we are seeing more and more S shaped guards on knives. I thought it might be time to discuss the development of an S shaped guard.
I put this in the "Forging Techniques" since it is forged. But just as important is the need to use subsequent heating to accomplish it, make it end up in a nice sweeping curve.
First, I would say that some might makers might approach the operation in a very direct manner, by simply forging the piece completely to it's final shape, the "S" included, before doing any filing or grinding to the piece. This might be the image that is in the minds of anyone who has not tried making an S guard. And it is probably the reason why more guys have NOT tried it. They are, of course, thinking with this direct approach in mind. The direct approach is a very risky, all or nothing, way of making oddly dimensioned pieces from steel. I say "making" instead of forging. Yes, we forge, but forging is a means to our end result. So, I am suggesting another way. One that I find easier, although one has to stay on one's toes lest it end up in one's trash can.
I go about it in stages. First I forge it.
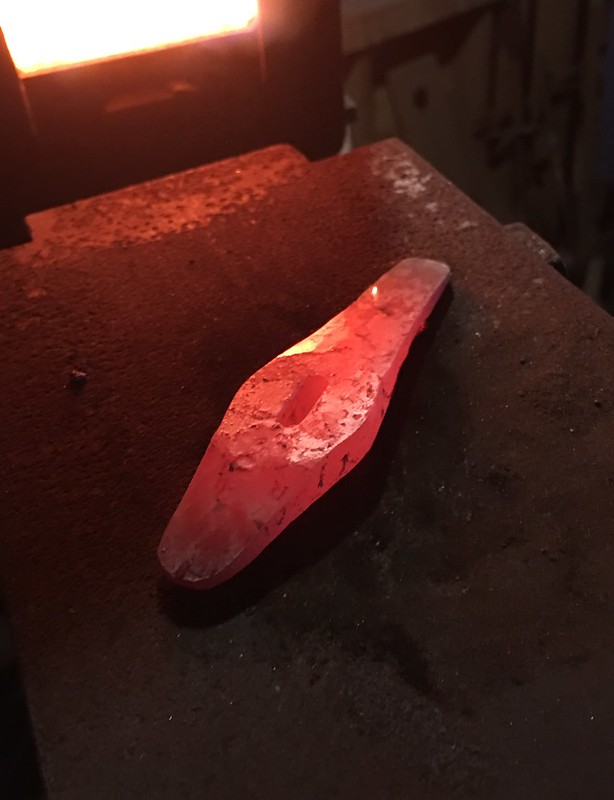
In the above photo, you see that the tang slot has been slit part of the way through, mostly to spread the piece and to get the slot started and save milling, etc. If you're going to mill, you might forge a parallel on the two adjacent edges of the guard to sit in the mill vise. I usually will grind the surfaces somewhat clean and rough in the tang slot while the piece is a bit over sized. This will allow me to drift the piece to true North and South by grinding, giving the slot priority.
In the next three photos you can see that the guard is still more or less straight and that the slot is almost fit to the ricasso and tang.


Ok, at this point the guard is 95% shaped and drifted to align with the blade. The slot is 95% fit too. Still wont quite fit right up to the ricasso.
I then use some soft jaw liners for my post vise and hold the guard straight up and down and heat the lugs with a torch and lightly bump them into the right curve that I want. The more careful you are by using soft jaws and a wooden or brass hammer, the less clean up you will have to do, but there will still be clean up and subsequent finishing. May as well accept that.
One other thing. When heating just part of the piece against the jaw of the vise, you will likely get a hamon of sorts right along the jaw line. So, immediately after I curve the lugs, I do a sub critical anneal.
Now it's time to get to finishing.
Part Two
When bending a piece, even when heated, there is a thing happening that will have to be dealt with, especially in our case. It's called the anticlastic curve. In this photo, you can see it.

You can see the edges where the file has made contact but the trench down the middle is untouched by the flat file. This the effect on an outside curve. An inside curve, logically, would have just the opposite, a ridge in the middle that would have to be filed down to make a flat cross section on the face. I use a round file and use a draw file motion. So as you might discern, there will be some serious clean up along the way. This is something you have to accept and come to terms with to make an S guard that, in my opinion, is interesting. I personally don't like a flat S guard or one that has sharp bent places in it.


A note on the anticlastic curve. In a lot of cases in blacksmithing, the anticlastic curve is useful not only as a design feature but in function. in the following photo, the wagon wheel hub band (with the notch), has a visible anticlastic curve. This flare looks pretty cool but also it helps fit the band onto the hub.

Thanks Lin. These little things, that make perfect sense in hindsight, have sure fought me in the past. I appreciate you taking the time to document and share this.
Chris
Lin--Thanks for taking the time to do this. I know that posts like this are time consuming to put together but the photos help a lot with being able to absorb the technique. [I learn a little more each time that I view one of these.]
Gary

Great w.i.p. Lin! What size stock did you start with, and how deep did you drift, one side only,both sides? Are you using a very thin drift,like 1/8"?
Thanks for sharing!
Bob
Thanks guys.
Robert, I use a quick made rectangular shaped slitter. Looks like a cold chisel. I just go in about 2/3 of the way leaving enough in the front to be sturdy but easy to fit to the tang and ricasso.
As far as stock, I think it was 3/8 X 1 inch 416 stainless. I pay little attention to the actual starting stock as long as it is big enough. I usually forge that into something that will set me up for the detailed forging. For instance, I think I cut the 3/8 X 1 into a 3/8 X 1 X 1 square and got it hot and forged the corners in a little forming an elongated octagon. From there I pulled and forged the material out to the rough forged guard.
Thanks Lin, that was very helpful. Great job!
Bob

Thanks Lin. That is a great demonstration and explanation. There are so many ways to do this style of guard.
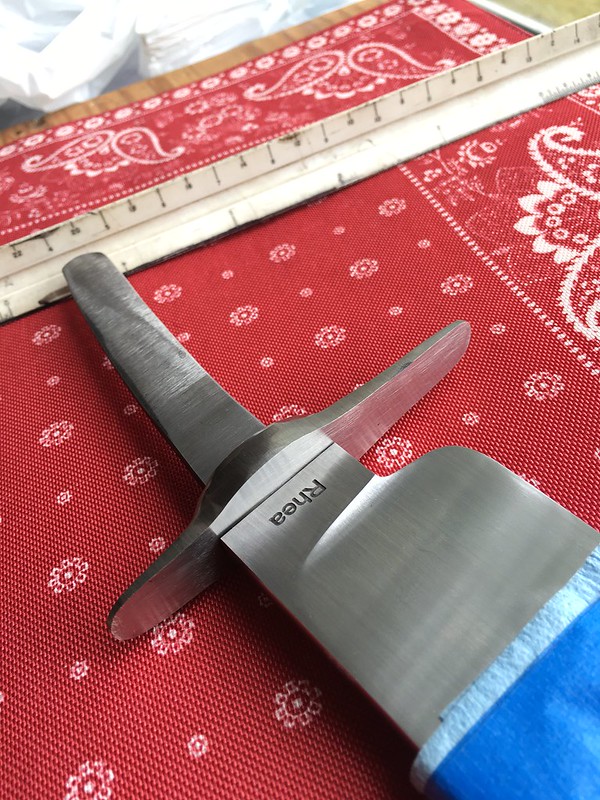
BTW-I especially like the choice/mix of textures you are using (polished sides, satin face) It really makes the guard a vibrant accent.
Joshua States
www.dosgatosforge.com
https://www.youtube.com/channel/UCdJMFMqnbLYqv965xd64vYg
https://www.facebook.com/dos.gatos.71
Also on Instagram and Facebook as J.States Bladesmith
“So I'm lightin' out for the territory, ahead of the scared and the weak and the mean spirited, because Aunt Sally is fixin’ to adopt me and civilize me, and I can't stand it. I've been there before.â€

This is wonderful!! I was thinking about making an S guard but really didn't know how to do it.
Thanks Lin
Thanks!
Cal, as Joshua says, there are many ways to make an S guard. The challenge it presents is on multiple levels. Even flat stock, gracefully curved into an S shape has it's challenges. I was wanting to sculpt the handle side which added to the confusion. <img src=' http://www.americanbladesmith.com/ipboard/public/style_emoticons//smile.gi f' class='bbc_emoticon' alt=':)' />
One thing I may not have made real clear in the above steps. After the initial forging, all heats, including the bends and normalizing (subcritical), can be performed at temperatures below where it would create any heavy scale. That's why I do a preliminary finish, getting rid of the forge scale early in the fitting stages. Light scale cleans up relatively easy after the curves are in.

Thanks Lin. Now how about an S guard with half penny ends.
Dale
Dale Huckabee
Journeyman Smith
dalehuckabeeknives.weebly.com
Dale, You would follow the principles of this process, but may have to change the order of the steps.
Do your high heat operation early and get rid of the heavy scale. Then light heats, if any are needed, and clean up. Always start over sized to allow for each subsequent reduction due to clean up or straightening.
I have been doing this with 416 stainless but again, the principles are the same.
As opposed to an oval plate guard, making a more complicated S guard does take more time and more heats, more of just about everything. This might run over into the next day or even two days adding substantially to the over all amount of shop time on a given knife. But in my way of thinking it is well worth it.
Lin,
At what heat (color) do you stop forging the 416 in order to avoid fractures?
Gary
Gary,
Good question. I stay in the low yellow to high red. The more reduction per hammer blow, the higher heat I use. After you've split the ends of a guard forging because you let it get below color, you learn to discipline yourself.
Working the material at these high heats means that later in the process you will need to normalize the piece or you will risk air hardening.
Thanks Lin. Good information.
Dale Huckabee
Journeyman Smith
dalehuckabeeknives.weebly.com
