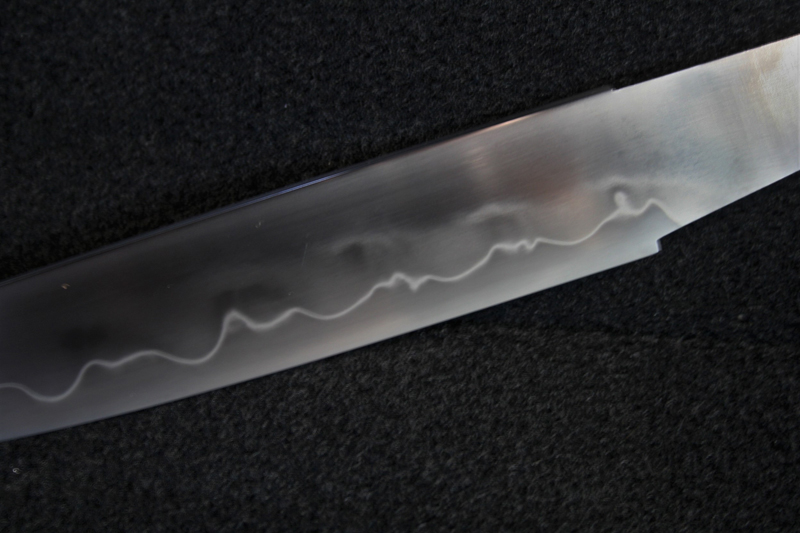
One of the things we do from time to time is revisit old topics. With the popularity of hamons over the past couple of years I think should cover this topic again.
First what is a hamon? Technically it is a line between the hardened martensitic edge and the less hard pearlitic body of the blade. The actual hamon you see is this boundary. The Japanese have literally hundreds of hamon styles from straight "suguha" to patterns like chrysanthemum blossoms in water "kiku sui" and three cedars "san bonsugi". If you want to produce hamons on your blades, a study of hamons is a good idea. So much to learn there. Look at actual Japanese swords if possible, study them. There are a number of very good books out there. I suggest starting with John Yumoto's The Japanese Sword, a handbook which is a classic. Also The Art of the Japanese Sword by Yoshindo Yoshihara and Leon and Hiroko Kapp.
So how can we produce these magical lines. The main thing is the right steel. The Japanese use a steel called tamahagane. It is a very simple steel of mainly carbon and iron with almost no alloying elements. Their preferred carbon content is between .65 to .75. Can we get tamahagane? Yes, but it is expensive. So what else can you use that will produce a hamon? First the steel needs to be low manganese for shallow hardening, second not huge amounts of alloying elements. My go to steels for hamons are W2, W1, 1095, and 1075. As we go through this topic we can cover heat treating for hamons, clay application, quenchants, and polishing.
So any questions you have, methods you use, or thoughts are welcome. I am sure we can all learn things from this. I am looking forward to it.
Brion
Brion Tomberlin
Anvil Top Custom Knives
ABS Mastersmith
Dito on the steels.
One can also make steel either from ore or by doing hearth remelts.
Hearth and bloomery are usually water hardening.
I use smooth black furnace cement (rutlands) as my clay.
I add a small amount of water so it has the consistency of creamy peanut butter.
Lay out will go one of two ways.
I either lay in Ashi lines first and then overlay the rest of the "Clay".
I find that Ashi lines combined with proper geometry and speed of quench will pull the "habuchi" which is the white line of the hamon, towards the downward portions of the line.
The other way I lay out clay is to put the mass of the clay about a third to half way down from the spine and then use the edge of a popsickle stick to pull through the clay which drags ashi lines downwards.
I have a friend who lays out his clay and then removes anything he doesn't want leaving behind the look hes aiming at.
He's the only one I've seen do this and I have never been able to repeat it myself.
If you want a repeatable uniformly undulating hamon you can lay out just ashi lines and then edge quench the blade. The combination of the ashi lines and the oil or water will cause an almost perfectly undulating line.
I LOVE Hamons! They're not only beautiful, but they can be a visual measure of the care taken in producing the blade and the heat treatment process. I have mainly focused on making hamons on 1084 steel knives because years ago I read (so many times) that it couldn't be done (?). I have moved on to other steels now that I find that particular steel is limiting on "activity". However, while working to make the best 1084 hamons I could produce, I learned a couple things: Temperature is a huge factor, and that too much clay (too thick) can also hamper control over the heating of the blade. Control of the heat is the most important factor to me, which means using the proper thickness of clay to allow you to heat the blade above critical where you want it hard and below critical where you don't. When considering clay thickness, you must also take into account the thickness of the blade (thinner near edge, thicker near spine). The "Hamon follows the Heat", Not the clay... Here are two 1084 exmples, one of which has 2 hamons (one around the gut hook blade & one along the knife blade) on a 4.25" blade, and the other created to resemble a Ravens wing on a 3.5" blade.
So many factors are involved in hamons it's difficult to even consider sometimes.
When I first started chasing hamons I had made good friends with Don Hanson. When I asked him one time for some help he just said, "Ya' gotta play with it."
Really?
I thought he was being elusive and vague. After doing them now for 15 years, I've discovered he was right.
I've often called creating hamons a "dance" between me the steel the clay the forge and the quenchant. Get one thing wrong and it's a failure.


Karl B. Andersen
Journeyman Smith
An example of what you can do. The steel is 1075 taken to 1485 degrees and quenched in parks 50. The blade style is a kwaiken or sleeve knife. The clay used was satanite applied at less than 1/16" thick. Three 15 second etches in 3 to 1 ferric chloride with oxide removal and cleaning in between. Polishing was done with 3M auto body rubbing liquid to remove oxides. Flitz polish and 1500 and 2000 grit sc polishing powders. Final polish is with 4F pumice powder. Turned out nice.
Brion
Brion Tomberlin
Anvil Top Custom Knives
ABS Mastersmith


