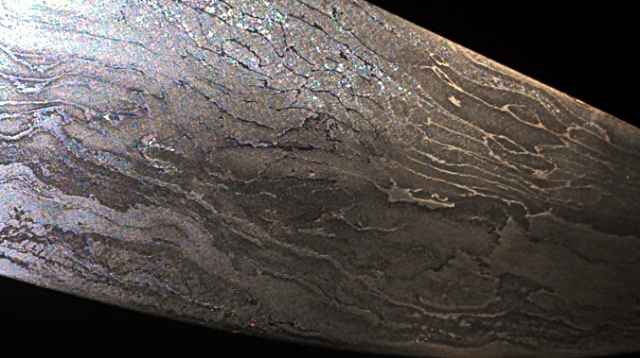
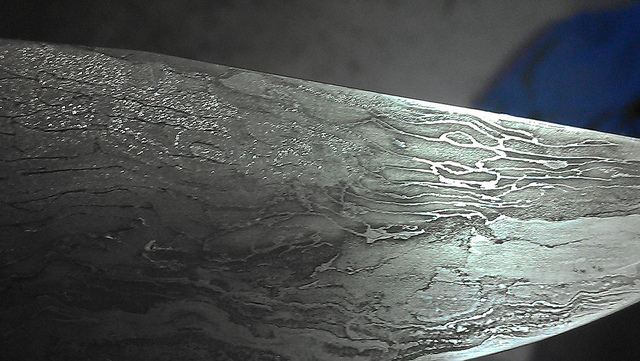
I've just finished out three cable blades that have come out of the etching bath looking like they were sprinkled with silver metal metal flake and I'm wondering why. This cable is tested 1084 logging cable,cleaned, forge welded and folded several times before being forged into the blades, it is then annealed before grinding, and normalized twice before heat treating. My heat treating process includes a presoak in the heat treat oven at 1495 for 20 to 30 minutes before being pulled out and cooled to just below color loss and then the bottom third of the blade is brought back up to non magnetic with a torch before oil quenching (oil is at 125 to 145). Tempering is generally around 375 unless the edge shows any chipping when tested. I sand to a 1000 grit finish before etching and do not notice any hardness differences (except along the quench line of course). This effect is most prominent just back of the point and runs back to the ricasso. the blades cut and hold edge really well and blade spine has some flex so I know they won't fail, and the customers think the effect looks really cool, but I'd like to know what's going on with the metallurgey. Any thought's? Thanks, Wes Sorry for the poor photo quality!
]
Wes, it's hard to see what you mean, but do those "flakes" appear next to the hardened edge? Is it like a transition zone between hard and soft? If yes, the same thing happened here while quenching C105 (W1 equivalent) in semi-fast oil. But that doesn't bring you any further. Let's hope somebody can explain this!
It's probably the steel T° and quenching speed...
Chrs
Wes,
Did you see any indication of the "metal flake" condition in the steel before you etched the blade?
Was your etchant and blade clean? Possibly some contaminant in the etchant or on the blade.
Dale
Dale Huckabee
Journeyman Smith
dalehuckabeeknives.weebly.com
I'll try to get a better pic, the steel was absolutely solid ( no flaking) and cleaned with acetone after being polished to 1000 grit. It's appearance is very much like if one were to snap a fully hardened bar of high carbon steel, only the area's affected were never hardened, and have toughness and flex. The etchant is in a sealed pvc tube and is about a year old though not used much. Ther was no sign of this sparkling before etching, heck the whole blade was almost a mirror. I did three separate etch's for 22 minutes each in a very cool room. The only other stock that gets etched in this acid is my wagon wheel wrought iron I use for guards.
Here are some more photo's,hopefully somewhat clearer. Thanks for the in guys!
Wes,
I can think of two potential reasons for your etching issue. First is that perhaps your normalizing process did not adequately deal with the enlarged grain structure from forge welding. The etch then displayed the enlarged grain along the blade spine, which was not brought to temperature by your use of a torch to harden just the edge.
I think more likely though, is that the problem is with the way you etched the blade. Three 22 minute etches seems severe to me. We all have our own preferred process for etching blades. But, I have gone to short etch cycles of only 1 or 2 minutes each. Cleaning the blade with Scotch-Brite between each etch cycle. The long etch cycles that you used may be causing pitting of the steel.
Below is a thread from the forum, where the topic of etching is discussed. In this thread, the oft misused term "oxides" is used for the decayed material that forms on the blade. I don’t know exactly what the chemical composition of this material is, but it is not by the correct chemistry definition an oxide. What is important to understand, is that all metal corrosion effects create a layer of material that is a combination of the base metal and the corrosive material. This decayed material forms a pacification layer, that will eventually stop the corrosion process. That's why we have to clean the blade of the decayed material to continue with the etching. The problem with long etch cycles, is that the pacification does not happen evenly over the surface of the steel. It begins with small areas becoming pacified and the etching stops, while other areas continue to corrode. This can create deeper pits where the etchant affected the steel longer.
Thanks Steve for the reply, and sorry for not getting back before now. The reason for the extended time on my etching is because my shop temp at the time was about 50 degrees and I knew the etchant wouldn't work fast cause I tried it for 12 minutes to start with and got very little bite at all. As it is the depth of the etch with the three mentioned cycles is barely enough to catch a fingernail, and it's a fairly new diluted mixture, just very cold! The grain growth difference makes a lot of sense but I use my tempering oven to do my normalizing. I'll set them in there cold and program it to hit critical and within a minute of it hitting temp I'll pull the blade out and let it air cool well below color lose before putting it back in for a couple more cycles. I'm really open to suggestions of my normalizing technique. I only run propane forges and we all know how well the blade tips and edges heat up long before the rest of the blade, so my thermal cycling needs some tweaking help. Thanks, Wes
I can see how the cold temp of your etchant would slow the etching process. I can't make any predictions about what problems this would cause, because I've never used FC below room temperature.
I still think your issue is with heat treating, as the "problem" area is near the unhardened spine. I'm wondering if the slow rise to temp during the first normalizing cycle is the issue. Maybe would be better to get the kiln to temp and then put the blade in it. The long rise of temp on the steel, amounts to a long soak. I would be interested to hear the thoughts of some of our better metallurgists on this.
Here is my two cents. Ferric chloride can be used to deposit cupric chloride onto a metal if the solution of ferric chloride reaches a saturation point with the addition of copper. The color of the deposited metal is anything from a green to a blue metallic color. I am not suggesting that you put copper into the ferric chloride but I am wondering if the wrought iron did not release a bunch of impurities into the solution. In wrought iron samples there can a sizable amount of phosphorous given that it can have about 2% slag which results in the fibrous structure of a lot of wrought iron. So, without a lot of time researching the process you may have introduced a phosphorescent deposit onto the blade. Do a piece of high carbon steel and see if you get the same effect after etching. You have only a few likely variables: the cable, the forge atmosphere, the quenchant, or the etchant.
Dan


