For whatever reason I have had good success when grinding a ladder into a billet and forging the blade but have not had good success pressing a ladder into the billet.
I would appreciate any input as to what thickness you use when pressing the pattern into the billet and any other tips that will help.
Thanks,
Gary
|quoted:
For whatever reason I have had good success when grinding a ladder into a billet and forging the blade but have not had good success pressing a ladder into the billet.
I would appreciate any input as to what thickness you use when pressing the pattern into the billet and any other tips that will help.
Thanks,
Gary
Gary, I haven't done much Damascus, but I did take a 3 day course at J.W. Randall's place. We did the ladder and raindrop patterns using his shop made dies. His ladder pattern dies were 1/4" pieces of mild steel rod welded crossways on the die block. I think the die blocks were about 3"x5". he had filed down the weld in between the rods. Of course the top and bottom should interlock. You should use stop blocks to maintain the desired thickness of the blade you will be forging. As you progress down the blade, just pull it back to you and let the last groove you pressed in slip over the closest rod on the die to you and press again until you get the length you want. Also, you should stop drawing out and straightening at a certain point because you are going to continue drawing when you press in the pattern. It all depends on the length you're after. Then the fun begins! He made me grind down all of the"humps"made by the dies. Couple of hours I guess. when your done, you should have a fairly flat blank of ladder pattern to take to the anvil. Al sells ladder pattern dies but the grooves are milled in. I asked him if he thought it would help to round over the tops of the grooves. He said "probably would". I'm just now getting my press ready, so I guess we can compare notes.

Gary;
I press in all my patterns. I prefer it; but probably because of lazy habit.
The question I have is; more specifically; what issues are you having?
Washed out patterns? Spine or edge? Uneven ladders? Are you stomping on ladders you have already put in? Many issues on ladders come up.
I start with a 1/2 billet going in the dies with a general preform of the blade. I get a lot of waste on grinding out as Bill said but I get a very defined pattern. The more layers you manipulate; the more defined the pattern is.
I work from the tip back to the ricasso on pressing in. Seems backwards but it allows me to seat the billet back in the grooves on passes and see where I am at as I deepen the ladders. Stops are a must in my opinion.
If we can get together somewhere I will show you my dies. Hope this helps.
M
Mike Williams
Master Smith
|quoted:
Gary;
I press in all my patterns. I prefer it; but probably because of lazy habit.
The question I have is; more specifically; what issues are you having?
Washed out patterns? Spine or edge? Uneven ladders? Are you stomping on ladders you have already put in? Many issues on ladders come up.
I start with a 1/2 billet going in the dies with a general preform of the blade. I get a lot of waste on grinding out as Bill said but I get a very defined pattern. The more layers you manipulate; the more defined the pattern is.
I work from the tip back to the ricasso on pressing in. Seems backwards but it allows me to seat the billet back in the grooves on passes and see where I am at as I deepen the ladders. Stops are a must in my opinion.
If we can get together somewhere I will show you my dies. Hope this helps.
M
Mike,
My main problem is washed out patterns. Possibly I am starting with too thick a billet before pressing. I have always been a little afraid of not having enough material left after grinding off the raised ribs after pressing. What thickness do you press to get the best pattern from your dies. (I'm using Uncle Al dies.)
Thanks,
Gary
Gary

Gary,
I seems to me that pressing with dies doesn't shift the layers of the damascus as much in the center of the material, as will forging after cutting grooves. The layers towards the outside of the damascus bar are extruded into the grooves in the dies, but the layers in the middle of the bar are not displaced so much. So to get a really good pattern, you don't want to stock remove a lot of material as you grind your blade. The best pattern is just below the pressed in ridges.
If I am planning to make 1/4" thick damascus, I forge the damascus stock to 7/16 before pressing with dies. I have west Texas wind and ladder pattern dies that I bought from Uncle Al. The WTW dies have grooves that are about .080" deep. When I bought the ladder dies, I felt that the grooves were cut too deep, so I ground the dies down so the grooves are about .090" deep. When I use these dies, my plan is to press the full depth of the grooves. I do not use stop blocks. My thought process is below.
The pattern in the WTW dies is cut around .080 deep in each of the dies.
.080 + .080 = .160
.160 + .250 (finished riccasso thickness) = .410
Add a little for clean-up grinding and finishing = .437 or 7/16"
The riccasso of the blade finishes out around .258"
The grooves in the ladder pattern dies that I bought from Al, were cut with a square sided end mill. Initially, I just broke the edges of the ridges before using them. I wasn't happy with the pattern that they made. The straight sides of the ridges made very narrow ladders, with what looked like random pattern bands between the ladders. There is nothing wrong with this pattern. But, I like to make mirror polished damascus. There wasn't enough chatoyance in this pattern. I went back and ground the ridges to a rounded shape. The rounded ridges expose the edges of more layers in the ladder and reflect light better. I think I would prefer to have all of my dies cut with ball end mills.
Given that die pressing doesn't shift the layers near the center of bar stock as much (at least mine don't), if you stock remove a blade from pressed pattern damascus, the pattern will be less defined at the blade's edge. To remedy this, I modified my pattern dies to be able to adjust to the bevel of a partially forged blade. I installed 1/2" guide rods through the mounting plates of both dies. The rods are welded at the bottom of the lower plate, to keep them positioned. The holes for the guide rods in the top plate are drilled slightly over 1/2", then I used a large countersink to cone the holes from both the top and bottom of the plate. I left about 3/32" of material in the center of the plate that is the diameter of the drilled hole. If the dies are not able to angle sufficiently, you can use a rat-tail file to open the guide holes a little. The springs are just to hold the dies open to insert the stock to be pressed. I use washers under one spring to pre-angle the top die to near the angle of the blade bevel. I cut a piece of 2" shafting in two and welded it to the center of the top plate. I put a flat die in the top mount of the press to push the top pattern die into the damascus material. This is a little hard on the flat die. It usually puts a small dent in it from pressing on the top of the shafting. I have to regrind the flat die to remove the dent. Or, you could just have a special die for this use.
When I use these dies to press a blade, I will profile the blade shape and forge the spine to 7/16". I forge in some distal taper, leaving the point of the blade around 1/4". I also forge the edge to 1/4".

Dies with deeper grooves may be more aggressive about shifting the layers in the center of damascus stock. But, this is the method that I have found will work for dies that have more shallow grooves. I get a very crisp pattern, from the spine all the way out to the edge of the blade.

Thanks Steve and Mike. Makes sense to me. Obviously I am going to have to do some experimenting with angling the plates slightly and some other adjustments. More fun.
Brion
Brion Tomberlin
Anvil Top Custom Knives
ABS Mastersmith
Thanks, guys. I appreciate the input & techniques. Looks like I need to spend some time re-tooling.
Gary
I think Don Fogg said one time that he could make ladder patterns only from now on and not cover the process.
I use rack gearing for my ladder dies. Available in just about any pitch you could possibly want and shaped right with very little tweaking.
I think a very simple solution to most pattern issues is just tapering the dies. Grind an eight off of one side on each two inch wide die and you have a taper of 1/4 to 0. Mash it to the stops.
A piece of modeling clay ran first will tell you what you end up with.
I like to clean grind my humps and have a finished blade ready for h/t.
M
Mike Williams
Master Smith

|quoted:
For whatever reason I have had good success when grinding a ladder into a billet and forging the blade but have not had good success pressing a ladder into the billet.
I would appreciate any input as to what thickness you use when pressing the pattern into the billet and any other tips that will help.
Thanks,
Gary
Hi Gary - My Damascus making experience is limited. My mentor in that respect has primarily been Kevin Casey, who has been extremely helpful in my progress. For that, I thank you Kevin <img src=' http://www.americanbladesmith.com/ipboard/public/style_emoticons//wink.gi f' class='bbc_emoticon' alt=';)' />
The Ladder Pattern is by far what I have the most experience creating. And for all of the billets made, I've pressed my pattern in vs. grinding. My first attempts were good, but not what I would call great.
I came to the conclusion that some of the issues I was having were related to the dies I was using. My ladder dies were purchased online from a well known, very reputable supplier. And just for the record, I wouldn't hesitate for one moment to buy any of the other products he makes for us. He's just one heck of a good guy !
After gaining some experience using them as purchased I inevitably ended up making some modifications to the dies, first by milling the steps deeper.
The more important mod I made to the dies(IMHO)was to mill more clearance between the steps. The added clearance allowed me to press considerably more distortion into my billet.
When I initially purchased the dies there was very little clearance between the steps when I would put the 2 dies together, in other words, very little wiggle factor. So I modified them on my mill accordingly.
Geometrically speaking the "high rails" on my dies are ~.160 wide, the gaps between those rails are ~.200 wide x ~.200 deep.
My thoughts were based on my experience in the Tool & Die / Mold Making field, and having built quite a few Stamping Dies in that time. Simply said, you need to factor in the thickness of the material being stamped into said parts so that the Die Set doesn't crash and/or get stuck together when it closes with that material in between it. And although the concept of pressing the ladder pattern distortion into our blades or billets isn't exactly the same, in theory I believe the principal in comparing the two operations still remains.
Those 2 mods, (milling the steps deeper, and adding more clearance between them) made all the difference in the world in the distortion I was able to introduce into my steel.
One other modification I made had to do with indexing problems I was having, when moving the blade/billet through the dies. I came to believe the indexing problem was related to a "half thickness rail" located on the front and back of both the top & bottom die. By milling those half thickness rails off (completely getting rid of them) I was able to eliminate all of the problems I was having in regards to indexing.
I hope these tid-bits will help you at least a little Gary.
<img src=' http://www.americanbladesmith.com/ipboard/public/style_emoticons//smile.gi f' class='bbc_emoticon' alt=':)' />
I know not, what course others may take, but as for me, Give me Liberty, or Give me Death
- Patrick Henry, 3-23-1775 -

For what it's worth, Check out Tim Hancock's method. It is neither grinding in or pressing (although he presses for fittings)but rather cutting it into an accordion with offset 45 degree wedges. Then flattening out the bar. The result is pretty much a perfectly symmetrical pattern. The wedges do not overlap across the center of the bar. For great visual aids in both the pressing method and the wedge-cut method. Check out Tim's book:
http://www.timhancock.com/books-for-sale/
available at Amazon: http://www.amazon.com/Tim-Hancock-Western-Bladesmith-Knifemakers/dp/9659090722
Joshua States
www.dosgatosforge.com
https://www.youtube.com/channel/UCdJMFMqnbLYqv965xd64vYg
https://www.facebook.com/dos.gatos.71
Also on Instagram and Facebook as J.States Bladesmith
“So I'm lightin' out for the territory, ahead of the scared and the weak and the mean spirited, because Aunt Sally is fixin’ to adopt me and civilize me, and I can't stand it. I've been there before.â€

I meant to respond to this thread way sooner but I've been forgetful.
Gary's other thread reminded me so since I just forged a blade, I thought I'd post this here for the record.
As usual, I do things different. I do not know why I think this way.
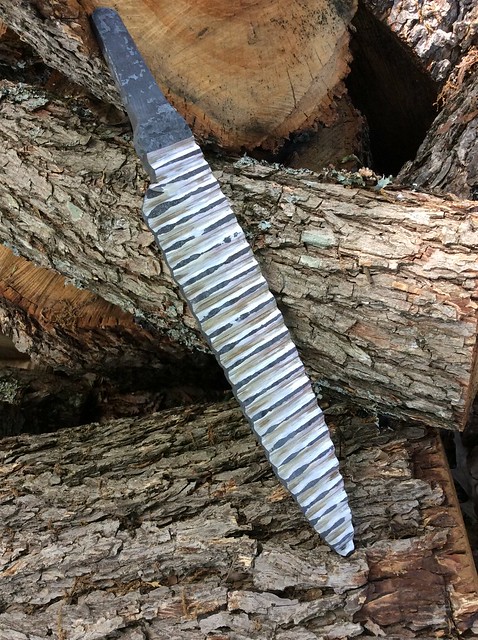
After I get my billet built up to the final layer count, I forge what I call the "embryo". It looks like a blade but needs some tuning and refining. It has taper, bevels, the ricasso is stepped up and the choil pulled down slightly. Just like a blade but really thick. The ricasso area is about 5/8 inch thick. The spine tapers to about 5/16 thick at the tip. The cutting edge is also about 5/16 thick all the way back from the tip to the choil. I did not take a picture but I think you can understand the description.
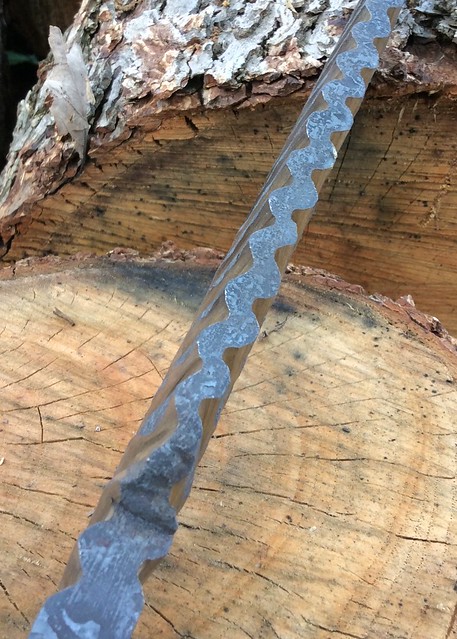
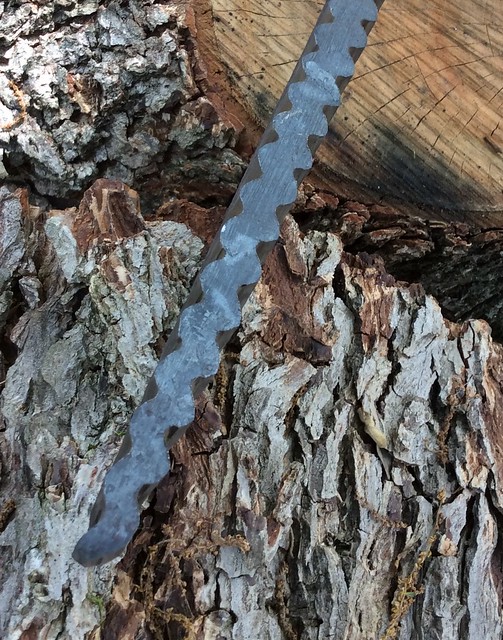
I now cut into the sides to about 1/4 the thickness at any given point. I do this with a basic side grinder with a 3/16 inch thick wheel. The grinder is held with the sparks going down. The blade is horizontal in the vice. The wheel is directly perpendicular to the blade. The groove layout on one side of the blade is offset from the other so the grind cuts are staggered, as you might imagine. To reiterate, since the ricasso is 5/8 thick, I cut into it a hair over 1/8 inch, maybe 3/16. Since the spine is thicker than the edge, I grind deeper at the spine and get shallower in that cut as it goes toward the 5/16 edge thickness. So, each cut is run shallow and deepened as I check and recheck it. Eventually I have the groves cut into both sides. Only when I am sure that I have the basic depths right will I proceed.
I then round the steep edges of each cut to prevent any shuts from forming as the blade is subsequently pressed or forged. You can see the zig zag pattern that the grinding creates.
This is near the choil looking at the edge after the grooves are cut and rounded.
This is near the blade tip.
This is the blade after it has been put back in the forge and forged into the refined blade shape. Now the pattern is in the blade.
This is how it will look. This has been W'ed as well.
Just a note for anyone who might want to do this. When figuring the starting embryo thickness for a finished blade thickness, just double the desired blade thickness and start your grind as I describe above. For example, I started this embryo 5/8 inch thick. I want it to end up about 5/16 for a finished thickness. Again, I grind into the blade 25% the embryo thickness which leaves, of course,75%. Even though this sounds like too much thickness, I find that this will be necessary to allow for the reduction that will take place when forging or pressing till the grooves are pretty well gone.
I have to say, this method is not for the faint of heart. There's not much room for error when eyeballing 25% of 5/16 inch amid all of the sparks and noise.
Thanks, Lin. I can see how this would add to the pattern.
Gary

not weird at all lin that is how I do it when I don't want the pattern to change from forging, though most of the time I use my miller to cut the ladder especially in cases were I want it to be very regular.  this sword was done that way, I forged the pre form to the profile (undersized) and distal taper then laddered it on the milling machine. even after forging in the bevels and fuller the pattern is still very regular and controlled, forging in the bevels after rather than before cutting the ladder give a wider "crescent" to the edges of the ladder, grinding in the bevel or forging in the bevel first will lessen that effect.
MP
One thing I like about this way of developing the ladder pattern is that I am in full control of the pattern. Or Not. <img src=' http://www.americanbladesmith.com/ipboard/public/style_emoticons//rolleyes.gi f' class='bbc_emoticon' alt=':rolleyes:' /> In other words, while it IS a lot of work on each blade that I do this way, I enjoy having the control shifted onto ME instead of tooling and dies. As long as I keep my original pattern centered in the billet, and I forge a straight blade, and I cut the grooves accurately and consistently, the final forging can be done with a fair amount of confidence that it will look good.
As with any Damascus pattern, for it to look even, Every step and stage must be done evenly from side to side and keeping things centered. I eyeball every step which makes me fully responsible as well as credits Me and not tooling.
I also like a reasonably high layer count to be sure that when cutting the 25% grooves, I am cutting through a sufficient number of layers to create a lot of offset/activity.
I'm sure this has happened to you before too. On an otherwise nice blade, One or two grooves are cut a few thousandths too deep right along the spine and you are afraid you're going to have to grind it away and mess up your pattern or end up with a thin blade. Here is what I do. I heat the blade to yellow and hold the blade edge down on the anvil and use light, fast, flat, overlapping hammer blows to "upset" the spine. Then heat again and lay on it's side and, again, using light fast hammer blows, fill in the voids. You can alternate from spine to side and it will fill in. Repeat as necessary. Don't just concentrate in the one area where the groove was. Run the hammer the length of the blade to make sure that any change in pattern is not spotty but is the whole length. Remember, light blows. A hammer mark is as bad as a groove.

I did not take pictures along the way with this, but I think we're all on the same page here.
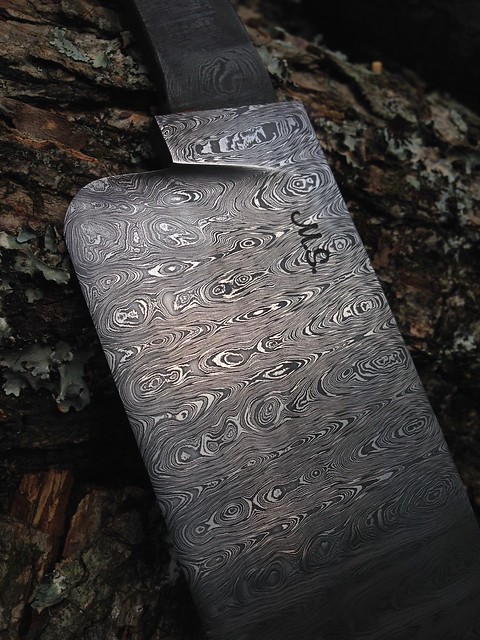
This pattern was pressed in.
I did an 'embryo' - thanks Lin - to about 1/2" thick, including forging in ricasso and choil area.
Just roughly so as to not distort the ladder when going from the blade to the guard area.
I use ladder dies and want to end up with a blade about 1/4" thick.
I also take into account refining the blade DOWN! to that dimension.
I have a spacer about .300 thick and use this to set my stop blocks so that the spacer just fits between the ladder dies.
Press it in and grind it off.
And even with no taper or bevel, I can find no difference in the pattern from spine to cutting edge. Go figure.

Karl B. Andersen
Journeyman Smith
